
All Cannith challenges are soloable by any character who can kill stuff. Due to scaling, it's noticeably more difficult to solo if you bring a hireling so I would recommend you use a self-sufficient character and no hireling.
The videos linked in thread are of my dedicated challenge farmer, a level 16 pure monk with dragonmark of passage for DDoor. He runs challenges at CR20 for +40% parts bonus. As an added plus, he can just barely open the chests you get for killing bosses, which have an ML of CR-4.
Extraplanar Palace
- Buying Time
- Labor Shortage
- Dragon's Hoard
Lava Caves
- Time Is Money
- Colossal Crystal
- Circles of Power
Kobold Island
- Short Cuts
- The Disruptor
- Kobold Chaos
Dr. Rushmore's Mansion
- Behind the Door
- Picture Portals
- Moving Targets
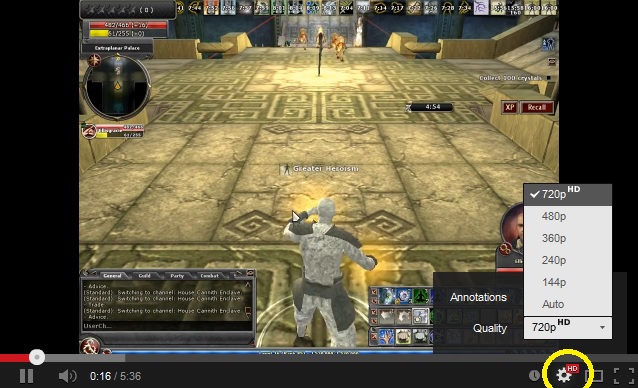
Note on videos: I run in 1024x768, which youtube recognizes as HD but for some reason it doesn't default to 720p when I play them back. (I think my connection speed is slow.) You may need to manually select 720p when you play them by clicking the little gear icon in the bottom right of youtube's player.
Also, I was concerned about youtube having a 15:00 limit per video so many of the challenges are broken into multiple parts. In those cases I link to playlists instead of the videos directly. Choose "Play All" from the playlists to watch the entire challenge without interruption.
Results 1 to 20 of 38
Thread: Cannith Challenge Tutorials
-
11-02-2013, 03:05 AM #1
 Cannith Challenge Tutorials
Last edited by EllisDee37; 04-14-2018 at 08:43 PM.
-
-
11-02-2013, 03:08 AM #2 Extraplanar Palace
These are torch line challenges. If you have never run a torch line before, go into Circles of Power (over in the lava caves) once to practice the spacing. Without doing anything, the kobolds will bring back enough crystals to buy 10 incense torches after around 10 seconds. Buy them, then spend the next 10 minutes or so practicing your placement and spacing. I use a mental 4-count to measure the distance between torches on a monk or hasted wizard, a 5-count on regular-speed characters.
In all Extraplanar Palace challenges, generally speaking you fight mephits in the east and yugoloths in the west with animated armors on both sides. I find mephits far easier to deal with so I always start with the east side on any extraplanar palace challenges.
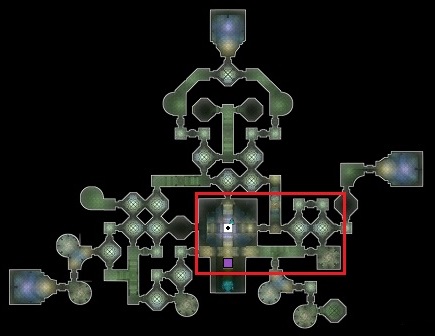
This small area will always (okay, maybe 99% of the time) contain enough crystals to reach 100, which will spawn Devashta on Buying Time and Labor Shortage. For Dragon's Hoarde she doesn't show up until you have 150 crystals so you might want to extend the line a little further east to ensure you can get 150 before pulling up the line.
In any case, the concept here is to finish laying down the line to the east before Devashta spawns, then kill Devashta while your workers are clearing the east. Once you kill her, you can then start rotating the line around the map, first to the southeast, then southwest, then west, and finally north.
Start
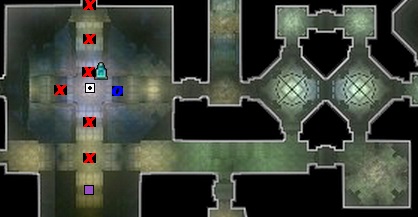
Standard beginning: Buff yourself, then pick up all five torches in a straight line plus the one to the west of the foreman, for a total of 6 torches. Leave the torch in the east untouched; we'll be using it as the base for our torch line.
After picking up the six torches talk to the foreman and buy all five workers. You may have to wait a few seconds for the last couple greens to come back to afford the last couple workers. Do not wait more than 5 seconds; come back and buy the rest later when you come back to buy torches. (For Labor Shortage, buy barrels instead of workers.)
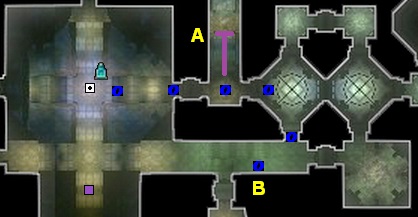
Scout Ramp
Place your first two torches to the east, then take a quick run up to the first plateau on the ramp to the north (labeled "A") to see if there are any purples or mobs there. Mephits may not be visible at first, so go all the way onto the first plateau and wait for a beat. If mobs are there go ahead and kill them all. Usually there won't be any purples there. If there aren't, go back down the ramp and finish placing the initial line east, south, then down beneath the ramp labeled "B", killing mobs as you go. You'll have one torch left once you finish placing those first 5 torches.
Buy Equipment
With the initial line laid, run (or DDoor) back to the foreman and buy your equipment from the foreman. Here's what I general buy: (If running with tokens, treat Buying Time the same as Dragon's Hoarde.)
Buying Time: 5 torches, 0 barrels, 0 teleporters, 0 healing torches
Labor Shortage: 10 torches, 10 barrels, 2 teleporters, 1 healing torch, Permanent Speed Buff
Dragon's Hoarde: 10 torches, 10 barrels, 2 teleporters, 1 healing torch
Extend Line
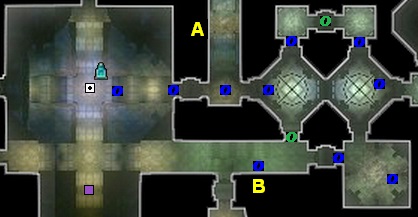
Once we have our equipment it's time to quickly finish laying the line east before Devashta spawns. Generally I try to finish the torches before placing the teleporters, but each map is a little different so use your best judgement. The two preferred locations for teleporters are highlighted in green. Note that for Buying Time speed runs I don't buy teleporters but I do try to cast DDoor in the teleporter locations.
Once the line is laid go wait for Devashta and kill her when she spawns. After killing her, pull up the line to the east and head southeast, then southwest, then west, then north. Buying Time speed runs will only do the east without moving the line at all. Labor Shortage will only move the line once, to the southeast.
Ramp Variation
Things are slightly different if there are purples in the first ramp to the north. When that happens, instead of continuing east I place the initial line up the ramp. I use two torches for this, being sure to put the second one on the plateau proper. If you just put one torch near the top of the ramp the kobolds won't be able to smell the crystals on the plateau.
Once the initial line is laid up the ramp, go and scout the rest of the eastern area to kill all mobs while the kobolds clear the ramp. Then buy equipment, pull the torches off the ramp, and lay down the rest of the line quickly so you can meet Devashta when she spawns.
Buying Time
For Buying Time, my goal is to never buy time. Done right, you can consistently average around 240 parts per 5:00 running 4 levels under the challenge rating, 300 per 5:00 during bonus weekends. That's almost 50/minute normally, 60/minute on bonus weekends. Buying time is my go-to challenge, my preferred place to farm xp pots and epic tokens.
For a long time I used to buy teleporters and barrels, but found that for 5:00 Buying Time runs this generally meant the kobolds were doing nothing for the last 30-45 seconds of the challenge after having finished the area. It also made it hard to lay down the entire torch line before Devashta showed up. So now I don't bother with them. This also nets me an "extra" 20 crystals by not spending them on two teleporters and ten barrels.
Note that if you're running this with daily tokens, doing 5:00 runs is counterproductive. For token runs, buy time around 5 times (to make it a 20:00 run) and follow the Dragon's Hoarde plan.
VIDEO: Buying Time
VIDEO: Buying Time (ramp)
You'll see in the (ramp) run I ran out of time after buying torches thanks to an ill-timed "Incoming!" So I quickly laid the east-south line and DDoored back for Devashta, never getting the east-north line laid. This hurt production a bit, but I still managed 245 mephit wings for my efforts.
Labor Shortage
Labor Shortage won't let you buy workers, so all we get is barrels for increasing production. Buy all 10 barrels and place them as early as you reasonably can. Also, buy two teleporters and place them in the eastern line at the start, but be careful not to place them too early or you'll spawn Devashta before you're ready. While you can't buy workers you can buy buffs for them. I like to buy just the permanent speed boost.
Since this is a fixed 10:00 run I generally buy a single healing torch and place it in the center by the foreman, to act as an anchor for the line.
VIDEO: Labor Shortage
Dragon's Hoarde
This is a fixed 20:00 run with no special features. To that end I buy all five workers, all ten barrels, both teleporters, and a single healing torch for the center to anchor the line. I do a clockwise rotation aronnd the map: east, southeast, southwest, west, then north if time permits.
Your workers will clear areas fast, so buy the full ten torches (though you can start with five) to allow starting to place the next line in the rotation as soon as you lay the last one. When laying "future" lines, skip the first torch to avoid connecting it until you're ready.
VIDEO: Dragon's Hoarde (playlist)Last edited by EllisDee37; 04-14-2018 at 08:45 PM.
-
11-02-2013, 03:10 AM #3 Lava Caves
These are torch line challenges. If you have never run a torch line before, go into Circles of Power once to practice the spacing. Without doing anything, the kobolds will bring back enough crystals to buy 10 incense torches after around 10 seconds. Buy them, then spend the next 10 minutes or so practicing your placement and spacing. I use a mental 4-count to measure the distance between torches on a monk or hasted wizard, a 5-count on regular-speed characters.
In all lava cave challenges there are yellow circles of power semi-randomly located around the map. If you place a teleporter in a circle, both you and the kobolds can teleport to and from that teleporter. For you to use them, click on the teleporter in the circle, or click on the little rock pile at the start to go back out to it.
The map is confusing due to there being 3 different overlapping levels. I've added my amateurish dotted lines to try and clarify the different levels, but the only way to really understand how it's laid out is to either run around in there or watch the videos.
I start all lava caves essentially the same way:
- Buff up, turn around and grab the two free torches from the entrance
- Buy 5 workers and 10 barrels and place all 10 barrels
- Buy 2 teleporters and 2 healing torches
- Pick up all the torches, replacing the 2 "main" ones with healing torches
Lava Caves isn't my strong suit; it's the map I know the least well of all challenges. Generally speaking I avoid lava caves where possible.
Time Is Money
After the standard start as detailed above you'll have 2-3 minutes left on the initial 5:00. If I saw purples to the east when picking up the torches I head east. If not, I run north to the bridge and look for purples on the western bridge as well as the platform to the east.
If I still don't see any purples, I start to get frustrated. Choices are then to jump down to the western bridge anyway and hope for purples in the turn, jump all the way down and hope for purples in the octopus cave, or head north and fight through an army of scorpions.
Usually I try for 5:00 runs to maximize my parts per minute.
VIDEO: Time Is Money
Colossal Crystal
I always farm the progenitor crystal from the octopus cave, which is straight north jumping all the way off the bridge. There are two possible circles of power down there, both of which work well. If there is no circle I recall and reset to try again. Because of that, I interrupt the initial start listed above to go scout and clear the octopus cave before laying barrels.
There are three main places I search for octopus crests. First (and preferred) is on the western bridge. On the north end of that bridge there's a pile of rocks, which often have an octopus crest. If it's not there, another spawn place right near there is further north, take the first left, and then about halfway down that cave on the right. The third place I look is east of the starting area.
For security crests, the preferred one is on the north side of the main bridge. If you find it there, wait and kill the two scorpions that will aggro on you. If you ignore them they'll head in to the kobolds and start killing them. The second location I typically go for is straight ahead from there, wrapping around and taking the first left. Head straight to the dropoff; a security crest spawns in that pile of crystals. Whether it's there or not, just jump off the cliff to get away from the horde of angry scorps and live with the moderate dungeon alert.
VIDEO: Colossal Crystal (playlist)
Circles of Power
There's no particular plan for Circles of Power. It's very long, and all you need to do is farm purples. So after the start listed above, run around and look for purples to farm.
VIDEO: Circles of Power (playlist)Last edited by EllisDee37; 04-14-2018 at 08:46 PM.
-
-
-
-
11-02-2013, 03:18 AM #4 Kobold Island
Kobold Island challenges are all about protecting extractors, which boils down to rote memorization of the map layout. Unlike torch line challenges you can't really do "well" by getting a lot of crystals. That means the returns are largely static.
Like all Cannith challenges, the larger your party the stronger the mobs are AND the more mobs spawn per wave. If you true solo, meaning not even a hireling, then you can buy magefire cannons to guard the small extractors for you while you're off doing other things.
There are two types of extractors: Small and Large. You have to start with smalls. Once your smalls have generated 300 crystals you can optionally turn on a large to almost double your production. However, larges come under constant attack, meaning you'll have to mostly abandon your smalls. If your smalls then get destroyed you're right back where you were as if you never turned the large on in the first place. Because of this mechanic I don't generally do larges on Short Cuts (because it's too short) or Disruptor (because you have to leave it unguarded to kill the disruptor.) I do go for the large on Kobold Chaos because the challenge is long enough for the large to have a real impact and you never have to stop guarding it.
To turn on extractors and build magefire cannons requires mechanical parts. The only way to get parts is to kill or drive off kobolds, who have camps all over the island. Some of the camps have totems. If you use the totem, all the kobolds in that camp are driven away, and you get parts as if you killed them. Those camps never repopulate after using their totem. Typically I'll use four totems and just kill kobolds in a few other camps if I'm just going for smalls. If I'm going for a large I'll use all 6 totems and kill a bunch of other camps multiple times.
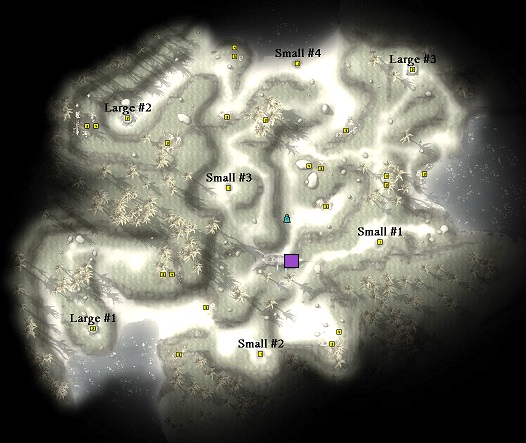
All three challenges begin the same way, with turning on all 4 smalls. Here's the basic map, with the big purple square indicating the boat you port in on:
After porting in, run to and use the totem just north of extractor #1, then activate #1. Two mobs will spawn and start attacking the extractor. Wait for 10 seconds or so to intercept and kill them before moving on.
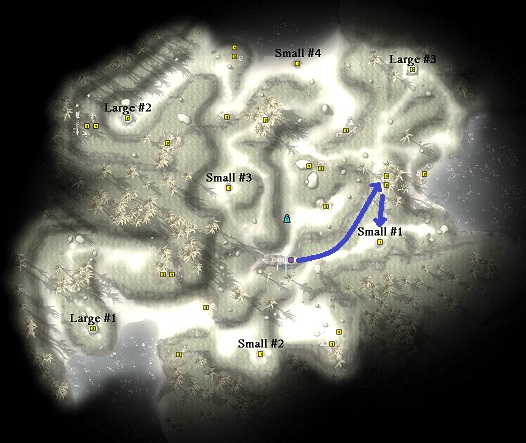
Head south to and use the totem between #1 and #2, then turn #2 on. Again, wait for 10 seconds to intercept and kill the two mobs who spawn.

Run straight from #2 to #3, turn it on, and kill the two mobs.
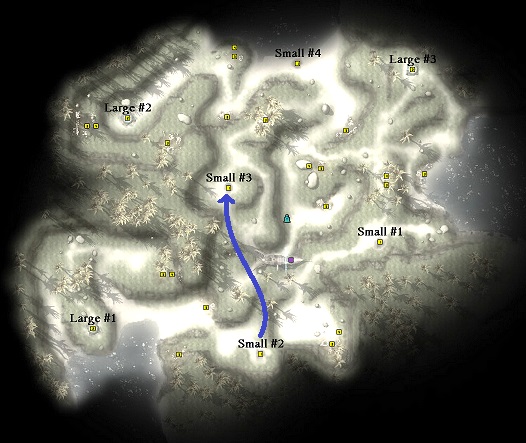
Now jump down off the cliff to use the totem that's in the middle of extractors #1, #3 and #4. Then head up north to turn on #4, immediately hang a left to turn on the totem by #4 then go back to #4 to kill the two mobs who spawn.
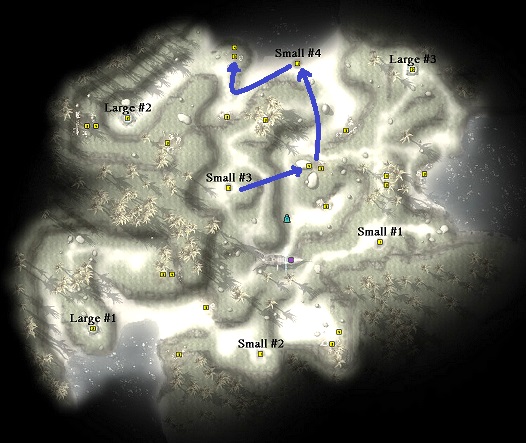
At this point you have all four smalls up and running. It's okay if one of the extractors gets destroyed while you're doing this first circuit; the key is to finish the circuit quickly to use all four totems to get a bunch of parts. You'll still need a few extra parts, so in the next few minutes try to kill 2 or 3 other kobold camps for extra parts. A great place to farm parts is between #3 and #4 since you'll be running that way anyway.
Once you have 75 shards farmed, upgrade whichever small you're closest to. At the same time, build a magefire cannon and place it a few feet away from the extractor. The next time you have 75 shards farmed upgrade and place a cannon next to another one. Repeat this until all four smalls are upgraded and have a cannon. Once you have this set up, you could go have a cup of coffee since you're locked into an auto-completion. But you can improve your returns by helping out the cannons to defend.
Optionally, you could go turn on and even upgrade a large. It costs 300 shards to turn it on, and 400 to upgrade it. Or, more satisfying (to me) you could hunt and kill the dirty, whiny archon with extreme prejudice. hehheh.
Short Cuts
In Short Cuts you fight evil outsiders. This challenge is only 10 minutes long so I tend to skip the larges and just stand pat with smalls.
You'll note that I deviate slightly from the standard opening here.
VIDEO: Short Cuts
The Disruptor
The Disruptor features all undead all the time. I like to use Mabar wraps for this. Anywhere from 1 to 3 times per run, a giant skeleton (the disruptor) will randomly spawn somewhere on the map. There will be a map note for him, so as soon as you hear him spawn open your map to find and kill him. While he's on the map none of your extractors will produce any crystals, so you'll want to kill him as quickly as possible.
Even though this run is 15 minutes long, I still don't like to activate a large because you have to abandon it to kill the disruptor. It's possible to do without losing the large but that's too risky for me. I like reliable results.
VIDEO: The Disruptor (playlist)
Kobold Chaos
This is the introductory challenge, so it's the full 15 minutes with no special concerns like the disruptor spawning. As a low level challenge you mostly face sahaugin and mudmen. Here's where I switch to a large after setting up all four smalls. I like to use the large between #1 and #4 since it's close to two smalls if I want to help out the cannons defending them. The other two larges are further away from the action.
Activating and upgrading four smalls, buying five magefire cannons and activating and upgrading a large take a LOT of mechanical parts. To prepare for this I spend the first 7 or so minutes killing every kobold camp I can, plus I take the time to use all six totems. You want 15 parts before you turn on the large.
In the video, toward the end of the run I turned small #1 back on and tried to build another cannon but accidentally spent my last parts upgrading the small. This was a costly mistake. My general rule is to never re-upgrade a destroyed extractor; only re-activate them.
VIDEO: Kobold Chaos (playlist)
Note on the Archon: She's an eladrin, like in Running with the Devils. I use a pair of crafted wraps for her: +5 Unholy of Greater Chaotic Outsider Bane. Shintao core enhancements break the cold iron part of her DR.Last edited by EllisDee37; 04-14-2018 at 08:47 PM.
-
-
-
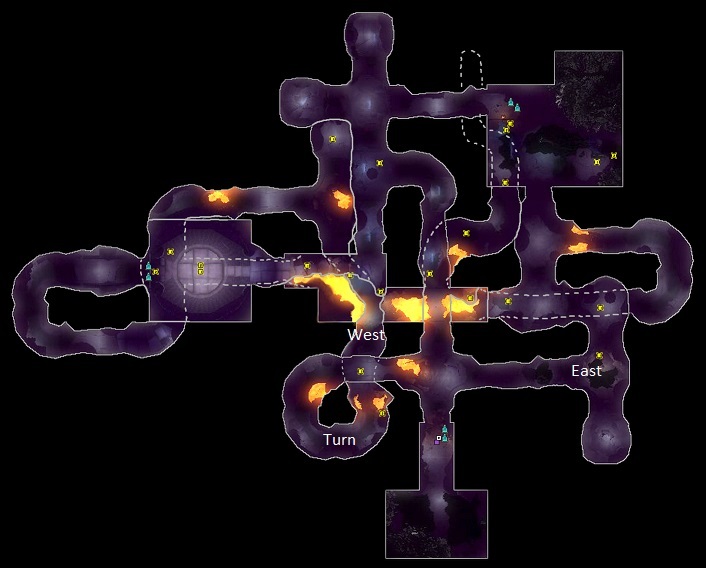
11-02-2013, 03:20 AM #5 Dr. Rushmore's Mansion
Mansion is an anti-zerg zergfest. You have to somehow zerg through a huge map while also breaking all breakables and killing as many mobs as you reasonably can. All three versions are essentially the same. Once you come up with a path you like, stick with it for every mansion challenge. A good path will allow access to every room on the map.
Most people start with the library, and then from the bathhouse a lot of people like to do the assassin next. I do it a little differently, going from the bathhouse to the observatory. There are the same number of crests along each route but I prefer the observatory because there's another 6 crests (one of each) in the puzzle room, allowing you to get through the doors if you're short one crest.
Both variations head back to the bathhouse and take the secret door to the banner hall, killing the spider along the way. Then finish out the rest of the map in pretty much the same path.
Shorter runs can often be less frustrating and just as rewarding in terms of parts per minute. A short run typically means you kill the first two bosses, head back to the bathhouse and take the secret door to kill the spider, for a total of three bosses with minimal doors.
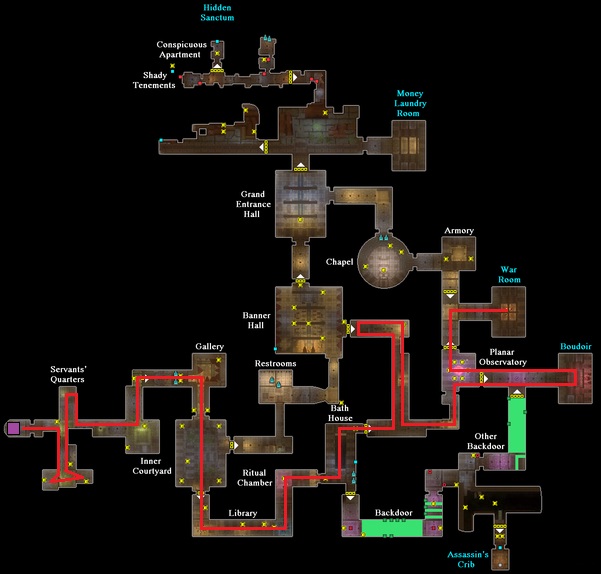
Here's the beginning of my path. Through the library and bathhouse, to the observatory, and then kill the two bosses in the boudoir and the war room:
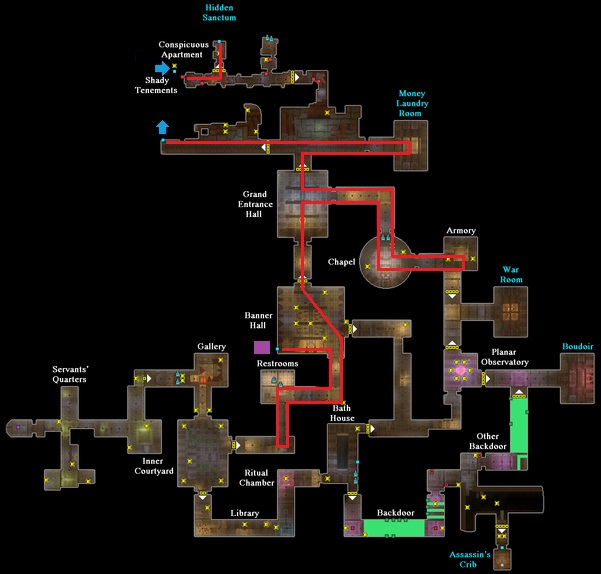
After killing the first two bosses, backtrack to the bathhouse and take care of the assassin. Once the assassin is down, backtrack to the bathhouse again and go through the secret door. Drop down the stairwell, kill the spider, then go back up the other side to the banner hall.

From the banner hall we'll want to make a quick pitstop in the restrooms. After the restrooms, go back to the banner hall and scan the ceiling (using Backspace or the Q key to auto-select targetables) and identify any crests in the rafters you actually need. Go ahead and grab the needed crests quickly, but keep an eye on your time. You really want to open the door to the grand entrance hall with at least 2:00 left, 4:00 after you slot the crests to open the door.
From the grand entrance hall we take a detour east to clear out the chapel and armory, keeping an eye on the clock. Do as much damage as you can, but get back to the grand entrance hall to open the door north with at least 1:30 left. (3:30 after you open the door.) This will leave you just enough time to finish the map.
Once out into the street, hop up to the roof and kill the kobold, then use the roof to head all the way west, bypassing a crest door entirely. Use backspace/q to check the crests along the roof, and quickly grab any that you need. When you get to the end of the roof, drop down and head through the secret door to Rushmore himself.
NOTE: When fighting bosses who are surrounded by elementals, water elementals give the boss fast healing. This means that water elementals need to be killed immediately, before you start fighting the boss. Try not to kill any elementals other than water to reduce the chance of another water spawning. Air elementals are annoying, sure, but water are much worse.
Behind the Door
My challenge farmer is level 16 and Behind the Door is max level 15, so I get a 10% penalty on parts. But this is the longest of the mansion challenges in that you start with the most time, and the mobs die so quickly that I typically do full runs. The parts per minute is terrible, barely more than 20 per minute.
VIDEO: Behind the Door (playlist)
Picture Portals
For picture portals I typically do "short runs" at level 20, meaning just kill the succubus, general and mother of the nest. A nice feature of picture portals is that you can sell time back to the kobold. So what I do is make a mental note where the kobold is at the start but do NOT talk to him so he stays put. Then after killing those first three bosses I DDoor back and sell the remaning time to the kobold to end it quickly. This ends up being worth a little over 30 parts per minute, which isn't too terrible.
VIDEO: Picture Portals (playlist)
Moving Targets
The trick to Moving Targets is that the assassin never moves. A guaranteed path is to go straight to the assassin (library => bath house => trap hall) and then double back to the bath house, drop down the stairwell and kill the spider. This is worth two bosses, which isn't bad considering you aren't at the mercy of random boss movement.
If any other bosses happen to move to the library, banner hall or restroom you can go kill them as well without opening any additional doors.Last edited by EllisDee37; 04-14-2018 at 08:48 PM.
-
11-02-2013, 03:27 AM #6
I think that's all the posts I need. Maybe one more tops, in which case I can repurpose this one.
-
11-02-2013, 06:43 AM #7Community Member


- Join Date
- Sep 2010
- Posts
- 292
thank you.
+1 to you sir as soon as i am able againif life gives you lemons, make lemonade.
if life gives you pickles, well you're screwed. because pickleade sucks.
-
11-06-2013, 10:53 PM #8Community Member


- Join Date
- Oct 2009
- Posts
- 85
Thank you very much for the hard work on this. The Rushmore vid couldn't have been more perfect because even with what looked like the most efficient run possible the last crest still required the rng gods to smile on you.
I am the natural one.
"When life gives you excrement, make Excrement Golems."
Disclaimer: My greenies come from comedy. I should not be confused with those who are knowledgeable and helpful.
-
11-10-2013, 07:26 AM #9
All finished.
The lava caves writeup is less than inspired, but I suppose that just reflects how little time I spend in there. I spent way too much time trying to come up with three different "single-level" maps to show each level independently, but that ended in tears. So I punted and just did my best with dotted lines to try and convey the levels.
The lava cave videos turned out pretty well, though, especially considering I managed to do all three in one take.
-
11-14-2013, 01:44 AM #10Community Member
- Join Date
- Jun 2010
- Posts
- 198
Great guide.
 Originally Posted by FlimsyFirewood

-
12-04-2013, 01:29 AM #11Community Member

- Join Date
- Jul 2012
- Posts
- 0
 Words can not begin to describe!
Awesome write up m8! This is helping me no end to learn the challenges which I have just struggled with since I first started playing especially... The Disruptor! Oh man that has given me so many headaches it's not even funny and now thanks to you I did a run totally solo (which I normally don't do) and pulled 357 mats! (running my farmer who is currently level 13 and did the challenge on 17).
Many many thanks buddy!
Stoner81.
Bio - Guild Leader of Roll For Initiative (Cannith Server)
Useful Links - Cannith Completionist List - DDO-Wrapper (custom installer) - Forum CSS Tweaks
Cannith Crafting Service - Collectible Farming - DDO Character Planner - CC Weapon Recipes Redux
UI Skinning - Rogue's Blackbird UI Skin
My Guides - BBcodes - Unlocking More Storage - Reduce File Size For Signature Image
My Builds - Epic Challenge Farmer v2 (Warlock) - Swiss Army Knife Challenge Farmer (Falconry)
The Pack Horse (mule)
-
12-04-2013, 09:19 AM #12
Thank you very much for this guide.
I have been hoping to farm for a Frozen Tunic sometime soon but the challenges often overwhelmed me.
And since I do happen to own a Monk or two, I'm feeling a bit emboldened again. Editor, The Book of Syncletica 2nd Edition: An unofficial DDO Monk Guide, and Stormreach Shadows: An unofficial DDO Stealth Guide(Stormreach Shadows updates are in indefinite hiatus.)The Order of Syncletica: A DDO-flavored blog on Monks and gameplay and more
-
12-05-2013, 12:48 PM #13Community Member

- Join Date
- Nov 2009
- Posts
- 79
 Awesome job, EllisDee
+1 to you: you've definitely earned it!
Awesome.Slow player: puggers beware!
-
12-11-2013, 05:06 PM #14Community Member
- Join Date
- Mar 2006
- Posts
- 21
Thanks a ton!
Finally ill be able to run challenges, hahahaha i didn't understand them back when they where implemented and since i never found a good guide i just didn't do them, this is exactly what i was looking for. Thanks a ton for this!
-
12-12-2013, 12:59 PM #15Community Member

- Join Date
- Oct 2009
- Posts
- 5,501
There is always an octopus crest either on the bridge, or across the chasm to the east of it. If you have Abundant Step you can always get that crest, whichever side it happens to be on. If not, you may have to run down eastward passage and waste time fighting a bunch of drow. Originally Posted by EllisDee37
"Beauty is in the eye of the beholder."
"Of course it is. Are YOU going to question beholder's artistic sense?"
-
05-04-2014, 11:48 AM #16Community Member
- Join Date
- Jul 2012
- Posts
- 0
For the kobold island ones I have started killing the kobolds then using the totem that way I get more parts and saves me running round all the totems.
Stoner81.
Bio - Guild Leader of Roll For Initiative (Cannith Server)
Useful Links - Cannith Completionist List - DDO-Wrapper (custom installer) - Forum CSS Tweaks
Cannith Crafting Service - Collectible Farming - DDO Character Planner - CC Weapon Recipes Redux
UI Skinning - Rogue's Blackbird UI Skin
My Guides - BBcodes - Unlocking More Storage - Reduce File Size For Signature Image
My Builds - Epic Challenge Farmer v2 (Warlock) - Swiss Army Knife Challenge Farmer (Falconry)
The Pack Horse (mule)
-
02-12-2016, 07:00 AM #17
Looks like ImageShack finally died. I'll see if I can dig up the original pictures to repost with postimage.
Unfortunately, those images are on the computer that is currently a doorstop thanks to the free Win10 upgrade making it no longer boot. (Black screen of death before the login screen, keyboard but no mouse.)
-
02-12-2016, 03:01 PM #18Community Member
- Join Date
- Jul 2012
- Posts
- 0
Aww man that's a bummer about your PC Originally Posted by EllisDee37
 I hope you can find all the images again. Just a thought I was thinking if it would be worth adding these tutorials to the wiki?
Stoner81.
Bio - Guild Leader of Roll For Initiative (Cannith Server)
Useful Links - Cannith Completionist List - DDO-Wrapper (custom installer) - Forum CSS Tweaks
Cannith Crafting Service - Collectible Farming - DDO Character Planner - CC Weapon Recipes Redux
UI Skinning - Rogue's Blackbird UI Skin
My Guides - BBcodes - Unlocking More Storage - Reduce File Size For Signature Image
My Builds - Epic Challenge Farmer v2 (Warlock) - Swiss Army Knife Challenge Farmer (Falconry)
The Pack Horse (mule)
-
02-21-2016, 10:42 AM #19Community Member

- Join Date
- May 2010
- Posts
- 123
Wiki! Wiki! Wiki!
I, for one, would really appreciate it if your tutorial (with pics and videos, if at all possible) were added to the wiki. Whenever i start up challenges i use this post for help and was VERY disappointing most of the pics were no longer available.
-
02-21-2016, 11:16 AM #20
I'll try to get the images back up tonight. Originally Posted by yoderc

 Reply With Quote
