


The Lost Quest Guide
Hello from the future! Word. So this thread was necroed after a few years of gathering dust, so I figured I would do a quick history for nostalgia's sake. Way back in '07 the forum mods decided to hold a contest for player written strategy guides and player guides. At the time there was nothing like this. The ddowiki didn't have a comprehensive quest guide and it was before spyderwolf was making his videos. I decided that this would be a great tool for myself and other players, so I set to it. In the end it took 3rd place in the contest, after SableShadow's Notes of a Dancing Rogue, and MysticTheurge's Ask a Loremaster. We each got the forum title "Scholar Of Adventure" and the other two got some other ingame gifts or something.
Anyways, fast forward a couple years and the mods come up with the compendium. In order to bring more traffic there they decided to copy the winning guides to the compendium. But joke was on them, I got an email telling me that there was too much info to move the Lost Quest Guide over to the compendium and it would take too many man hours for them to do it, so this guide wouldn't make it over there. Also the editors over at ddowiki were beginning to get the quests section filled out and the wiki was really becoming the go to source for that kind of info. While I'd like to think that some of my project here helped them to make that resource better, I know that those folks do a huge amount of work to keep that wiki awesome. Still, I tried to keep this thread going for a bit longer as it was my pet project.
Fast forward a few more years and I've stopped updating at all really, the wiki crew has more than done a great job filling this niche and I prefer to spend my time playing. Then ddo forums make a big change in software and all the old links get broken. This guide I think helped quite a few folks over the years, but it is out of date, and I didn't really see a need to spend the hours necessary to fix it all.
So now here we are in the future. DDO has gone thru many devs and ownerships. I am still here and playing, at least from time to time, and I still enjoy the game. I've made some great friends. Have some great memories. I plan to continue that. Cheers to you all! Everybody Drink!
Last Updates: 11/08/09
So as you have probably noticed, I am no longer maintaining this guide. Many of the walkthroughs are still valid, and can hopefully continue to help guide you through the trickier spots of older quests. Perhaps someday I will come back through and clean it all up and give it an overhaul, add all the new quests. But probably not. It's a huge project and I have found that I would rather spend my gaming time, well, gaming. I am always happy to share my quest knowledge though, so if you ever have a specific question, and don't mind waiting a bit for an answer, feel free to pm me. Also, I play on Sarlona and I am never anonymous. If I am not busy leading raids or whatnot, I am happy to spend a few minutes talking about questing or character builds or whatever. My characters are in my sig, or just ask one of my guildies to direct you to me.
The purpose of this guide is to help to familiarize a player with a quest. It is also to help you determine what quest you want to run, what classes you may want with you, what the rewards might be. There will be spoilers in this guide, so do not continue reading if you do not want to have the veils of mystery lifted.
Quests are organized by criteria (level, favor, chain) and then alphabetically. Quests beginning with the word ‘the’ will be alphabetized by the second word in the quest.
This guide is listed throughout this thread. The links below will connect to single posts to make navigating easier.
Outline
Lost Quest Guide - Outline
Optional Search Criteria
Korthos Island ~ New Player Experience
Raid Flagging Guide
Quest Chains
Favor Rewards and Quest Listing
Search Quests by Level
Level 1
Level 2
Level 3
Level 4
Level 5
Level 6
Level 7
Level 8
Level 9
Level 10
Level 11
Level 12
Level 13
Level 14
Level 15
Level 16
Level 17
Level 18
Level 19
Level 20
Results 1 to 20 of 278
Thread: The Lost Quest Guide
Hybrid View
-
09-26-2007, 09:18 AM #1
 The Lost Quest Guide
Last edited by Lost_Leader; 12-21-2016 at 05:14 PM.
Leader of Lost Legions
~Sarlona~
-
09-30-2007, 08:29 AM #2
The Lost Quest Guide - Outline
The purpose of this guide is to help to familiarize a player with a quest. It is also to help you determine what quest you want to run, what classes is you may want with you, what the rewards might be. There will be spoilers in this guide, so do not continue reading if you do not want to have the veils of mystery lifted.
If you would like to contribute any knowledge to the quest guide, or perhaps fix an error, please post here on our forums, or PM Lost Leader on the DDO forums.
Disclaimer: DDO is an actively changing game, where the developers will come back and give a tweak here and there to make things more playable or more interesting. Information here could become obsolete with the curl of a developer’s finger. This doesn’t happen often, but it does happen from time to time. (Examples: new loot tables, new spells, monster changes and such, can all change the validity of some information contained herein.)If this guide becomes outdated, please let us know by posting on our forums, or PM'ing Lost Leader on the DDO forums. We will update it with the correct information as soon as possible.
Quests are organized by level and then alphabetically. Quests beginning with the word ‘the’ will be alphabetized by the second word in the quest.
Layout
Quest Name
(Quest Chain, if any, and what part)
Quest Giver: The name and location of the quest giver
Level: the level and type (Solo/Party/Raid)
Patron: The Patron and the point value (normal/hard/elite)
Length: Duration assigned to the quest at the door (not always exact, but an indicator of time you should plan for)
Entry Point: Where the entrance to the quest is located
Prereqs: Any requirements to log or run a quest
Recommended Party:
This will include if there are any statistic or class requirements for completion or optionals in a quest. It will also include what I feel is a good party for the quest. This is not to say it can not be run with another mix, this is just a guideline. Most quests I have qualified with one of two settings. Any or Standard.
--Any: These quests are well within the capabilities of a party of the same level. As such, any group of six should be able to complete it. In a group without a healing class, all players should be responsible for self-healing items.
--Standard: A standard group by my definition is a Tank, Cleric, Sorc or Wiz, Rogue and two DPS or support extras (these can be doubles of other types). A bard is always welcome.
Base Experience: The base experience point value of the quest
Quest Info:
--Creatures: a general idea of what type of monsters to expect. This will not give the exact types, so it won’t say all class types of the kobolds you are facing, or the specific race of spiders, but will say kobolds and spiders
--Traps: will say what types of traps to expect, but not dc or location. This will help determine if you want a trapsmith in the party
Walkthrough:
A general walkthrough with a few pointers. Some will give step by step instructions to help through a difficult quest (Ex. The Pit), others will just give you a general idea to help you remember a previous run, or help you form a strategy (Ex. Stromvauld’s Mines).
End Reward: This will say whether a quest has a reward or not, and if it has any static loot in the end reward
Common DDO jargon used in this guide:
Agro: Aggression. This means you have the attention of the badguy.
Caster: Wizard or Sorcerer (sometimes bards) This means an arcane spell caster
DPS: Damage Per Second. A dps character is built for high and fast damage output. Barbarian, Ranger, Rogue, sometimes fighter, monk or paladin, occasionally casters will build for high dps (theirs is limited by a power bar)
DR: Damage reduction. This will usually be listed as how much, and then what will by pass. So 10/Silver is a damage reduction of 10 damage per weapon hit, but a silver weapon will bypass it. Spell damage is not affected by DR
Healer: A character made to assist the party by keeping their health full. Stereotypically this means cleric. Bards also can be made to heal, and Paladins and Rangers both have access to cure spells at levels 4 and beyond (though they can use cure wands at lower levels) In the case of warforged, any arcane caster with a repair spell could also be considered a healer.
Tank: Usually fighters or paladins, sometimes rangers, monks and barbarians, often with a couple levels of rogue. A class built to be taking hits. High AC, High Hitpoints and hopefully high saving throws. The best of them will use intimidate, because they won’t do as much damage as the dps types, but will want to be the ones getting attacked.
Red-Named: Main boss type, with a large list of inherent immunities. These include immunities to charm, death effects, hold (and similar effects like flesh to stone), level draining, paralyze, stat draining, stun, trip.
SR: Spell Resistance. You roll, add your caster level, add any spell penetration items or feats. If your total is higher than the spell resistance your spell gets through.Last edited by Lost Leader; 08-13-2008 at 04:39 AM.
Leader of Lost Legions
~Sarlona~
-
10-02-2007, 09:13 AM #3
Added a small quest flagging guide, since some of the more common questions I am asked by friends are what is needed for the raids. Though they usually are asking about The Reaver's Fate, or now, Accursed Ascension, I went ahead and did a short guide on all of them.
At this point I am still workin on the walkthroughs for the Orchard quests, and hopefully will have Litany completed soon. Still helping guildies get flagged
Last edited by Lost Leader; 10-02-2007 at 11:01 AM.
Leader of Lost Legions
~Sarlona~
-
10-09-2007, 06:51 AM #4
Orchard Quests and Litany of The Dead now have their walkthrough's completed. They are under the level 14 and 15 listing.
I would love some feedback on the Inferno Walkthrough. It is a complicated quest to explain and guide through text, I want to be sure my guide there is understandable and clear. Please tell me how it works for you, should you use it
Edit: The Inferno Walkthrough is now a .html instead of a .txt -silly me.Last edited by Lost Leader; 10-09-2007 at 05:36 PM.
Leader of Lost Legions
~Sarlona~
-
10-28-2007, 02:15 PM #5
Updated with some new information after the most recent dev tweaking.
Added a new Favor section. On this page I put in all of the Favor rewards, and a quest listing organized by Favor Patrons. Each Quest has a link to the quest walkthroughs.
Added a new Quest Chains section, so you can search which leg of the chain a particular quest is.
As always, any feedback, new info, updates, corrections are all welcome.Last edited by Lost Leader; 10-28-2007 at 10:37 PM.
Leader of Lost Legions
~Sarlona~
-
11-11-2007, 03:09 PM #6Founder


- Join Date
- Feb 2006
- Posts
- 0
The XP debt message was just because you logged in. The disintegrate is probably because you drunk a Potion of Wonder instead of a Silver Flame potion by accident - they look the same. Originally Posted by Lost Leader
Garth
Garth 20/ftr (Kensei) Haeson 20/clr Cairis 12/ftr 6/rgr 2/rog Xortan 20/wiz
Tinosa 20/brd Garthbot 20/fvs Gaarth 18/ftr 1/rgr 1/rog (Stal Def)
Tibetan 20/mnk Automatic DDO raid timers Haezon 20/sor (Conj)
-
03-10-2008, 02:58 PM #7Community Member

- Join Date
- Aug 2007
- Posts
- 332
Updates on this, would be nice to see some Lost Legions Stuff for the Mod 6 Quests, I've been salivating for some updates because you guys do such a **** good job.

-
03-20-2008, 11:49 PM #8Community Member
- Join Date
- Jun 2006
- Posts
- 1,136
Thank you
I really want to say thank you. This has been of tremendous help.
-
03-24-2008, 01:20 AM #9
Rainbow in the Dark
Quest Giver: Quest Entry Point gives the quest. Walkup.
Level: 16 Party
Patron: The Twelve (8/16/24)
Length: Very Long
Entry Point:Southwest cliff in the Vale of Twilight. Pic of Route from Meridia
Prereqs: none
Recommended Party: Standard. Trapsmith Recommended. Dimensional Door is nice, too.
Base Experience: 8,433
Quest Info:
--Creatures: Earth Elementals, Rust Monsters, Fiendish Bats, Stone Golems, Stone Scorpions, Bearded Devils, Orthons, Fiendish Troglodytes, Fiendish Scorpions, Fire elementals. Gelatinous Cubes, Shadow, Beholders, Gnolls.
--Traps: Both disarmable and non-disarmable. Spike filled pits, Fire Elemental Trap Rooms, Gelatinous Cube Drops, Lightning Traps
Walkthrough:
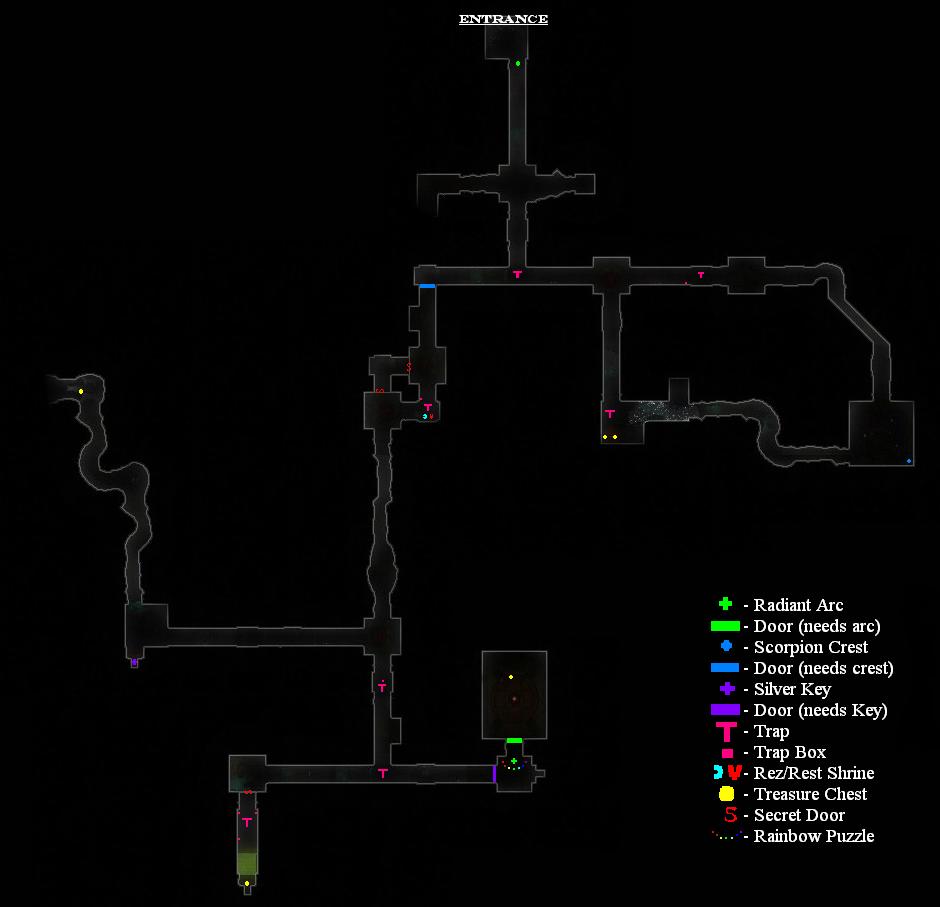
The quest opens up into a front chamber with a scepter sitting upon a pillar. This scepter, The Radiant Arc, is both a powerful magical item, and your light source through this very dark quest. The wielder of the Arc should place it in their offhand, so that everyone will be able to see in the dark tunnels ahead. Even should the Arc wielder die, their ghost will continue to give off light from the Arc. (Upon leaving/releasing, the Arc will drop).
Note: it is possible to bypass the need to stay near the Arc Wielder, by turning up your gamma setting in the options panel. Some will cry cheese tactic, others will defend it, or use it to bypass a griefer with the Arc, but it is there, none the less. Don't adjust it, or turn it down, to give yourself a truly RP/immersive run through this fun quest.
Head through the rough tunnels past bats, earth elementals and rust monsters (numbers of which type will vary from instance to instance) until you reach the structured area beyond. The first turn into the ruins will set ya by a possible spike pit, and an Elder Beholder sitting at the entrance. Then head up to the crossroads. Be careful at this point, there is sometimes a "button" on the floor. If stepped on, the small crossroads will slam shut, leaving trapped anyone inside with a group of fire elementals.
Head east first. At the crossroads, if you have a Dimensional Door caster, travel south. If not, first go with your trapsmith (if you have one) further east to check for the trap marked on the map. It is in the area with the gelatinous cube, and isn't always there. After the trap is disarmed, if necessary, head south. Once again, possible lighting traps will be at the end of this hall. Once disarmed, test your luck on the two bonus chests with the falling floor. There is much debate as to whether there is any solution other than luck to this puzzle, none have worked for me yet, so I will leave it to you readers to decide. The hottest thread on the topic is here.
What I usually do is have an evasion type work the puzzle while the others stand back. If the door opens, we all cheer, dance and loot. Then head back north and take the route east from the crossroads to the demon chamber with the scorpion crest. This seldom happens. What usually happens is the floor falls out under the puzzle solver, everyone uptop looks down the hole and chooses a semi-safe path, and hops on down. Take out the earth elemental at the bottom, pluck some gems from the walls, and head east.
You will find yourself above a chamber with demons. We have a couple of strategies here, depending on the difficulty, who is there and what equipment we have. The most efficient thus far is to have an archer with a banishing weapon that doesn't bypass the devil's Damage Reduction snipe from above, and pick them off one at a time. if one agros, we pull it back the hall to the rest of the group and deal with it. if this isn't an option, we will fill the hall uptop with crowd control spells and pull them up to us. This way if there is an issue between waves, we can try and get ourselves situated again for the next pull. Once a few waves of demons are dropped, the big Orthon, Agornathy, will come out of the pit. Take him out to lower the barrier around the scorpion crest. Drop down if you haven't yet and pick it up.
If you have a dimension door, now is a good time to throw it down. If you dont, fight your way back west to the original crossroads and open the door west with the Scorpion Crest. Watch out for the trap down this hall if you didn't disarm it. It is a teleport ring that will appear after you kill the cube, it will teleport you to a room filled with fire elementals. Survive the elemental ambush to get out (about 8 elementals). If you die in the pit and no one grabs your stone, there is no way out. Also, if this happens to the Arc Wielder, you will not be able to complete the quest. So be careful!
Head south, kill the Cube, search out the secret doors for the bonus, be careful approaching the shrine, it may be trapped by a fire elemental room like the one described above.
Head south to the next crossroads. Travel west first, to retrieve the silver key and an optional chest. Fight your way past the gnolls, grab the key, head north through the rust monsters, bats and earth elementals if you want the optional chest, but be wary, it is guarded by Memnezerez, a big mean beholder.
Once done there, travel back to the south. be careful of the spike filled pit, it has a trap on the center pillar which will drop a Cube on your head. The box is located on the center pillar. Get everyone across and continue south. At the crossroads, again be wary for a possible "floor button" trap. If you have a trapsmith, consider traveling west first for an optional locked chest. It is past some gnolls down a trap filled hall, marked on the map. Then travel east and unlock the Silver Key locked door.
This will bring you to the Rainbow Puzzle room. Solve the puzzle to lower the barrier over the pillar, and place the Radiant Arc in the pillar to open the door to the final room. (The puzzle is currently optional, though easy. You can skip it and just place the Arc in the pedestal through the barrier, though.) To solve the puzzle, just remember your skool. Roy G Biv. Red-Orange-Yellow-Green-Blue-Indigo-Violet. Here's a picture.
The final boss, A big red-named Fire Elemental, will spawn when you approach the center brazier. Be prepared for him. Usually a healthy dose of powerful cold spells does the trick.
The final chest will drop The Shavarath Stone of Foresight, one of the five stones needed to flag for the Shroud Raid, and a material component to make Greensteel items. It also has a chance to drop Greenbriar Twigs or Glistening Pebbles, a;so ingredients for Greensteel.
End Reward: Standard Loot Reward Choice, reward giver is in Meridia Bar, Walther Daedal.Leader of Lost Legions
~Sarlona~
-
03-24-2008, 03:22 PM #10
Running with the Devils
Quest Giver: Quest Entry Point gives the quest. Walkup.
Level: 16 Party
Patron: The Twelve (8/16/24)
Length: Very Long
Entry Point:North/Northeast cliff in the Vale of Twilight. Pic of Route from Meridia
Prereqs: none
Recommended Party: Standard.
Base Experience: 7,099
Quest Info:
--Creatures: Eladrin: Bralani (sorcerer) and Ghaele (cleric), Wisam (djinn), Air Elementals, Twilight (Invisible) Stalkers, Earth Elementals, Bearded Devils, Othons, Tieflings
--Traps: None
Walkthrough:
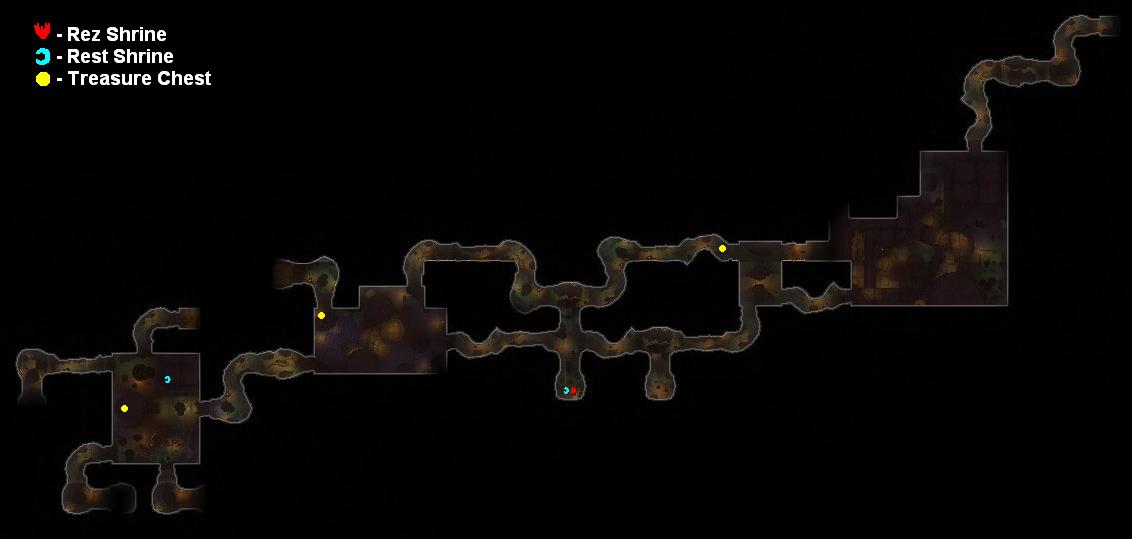
You begin the quest on the east side, and work your way west.
The premise of this quest, is that you are being tricked by an "agent of The Twelve" to break him out of the stronghold. This ends up making you take sides against the Eladrin, while they are also fending off a Devil attack.
The Eladrin bralani and ghaele's will be your primary enemies. They are Chatoic Good outsiders. The bralani sorcerers primarily use lightning spells and ice storm. The ghaele's will often lead off with deathward and spell resistance, then switch up to flamestrike and super-searing light.
After the first fight with the Eladrin guards, you come to a small gateroom with a huge mirror on the wall and a gate heading further into the Stronghold. A peak in the mirror reveals that it holds enchantments, perhaps an ability to percieive what is coming? or warn of impending danger?
Head past the gate into one of the Strongholds main chambers. Our common strategy here has been to set up at the base of the ramp with crowd control spells (dance, solid/acid fog, mind fog) and persistant damage spells (bladebarrier, firewall), and then to send a sturdy melee to pull back small groups of enemies at a time, until we clear to the top of the first ramp. On normal settings, banish weapons work great, on elite we switch it up to vorpals. The problem is that the Ghaele's will cast deathward and SR, so you may need some damage weapons instead of insta-killers. Axiomatic, True-Law, Chaotic Outsider bane are all goodies. And Greater Dispell magic sure can come in handy.
The goal is to clear the chamber of Eladrin, then head through the top levels to the gate house and pull the two switches which open the gate in the southwest. The top halls are filled with more Eladrin, as well as Ancient Air Elementals, Wisam and Twilight Stalkers.
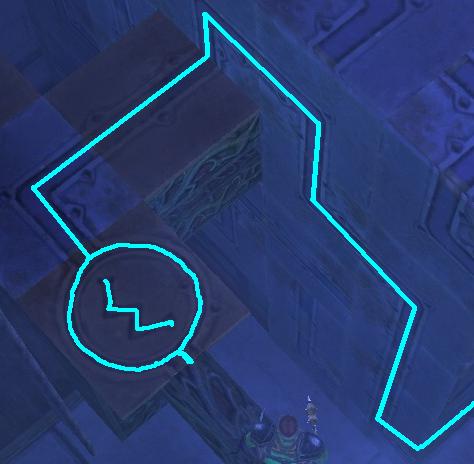
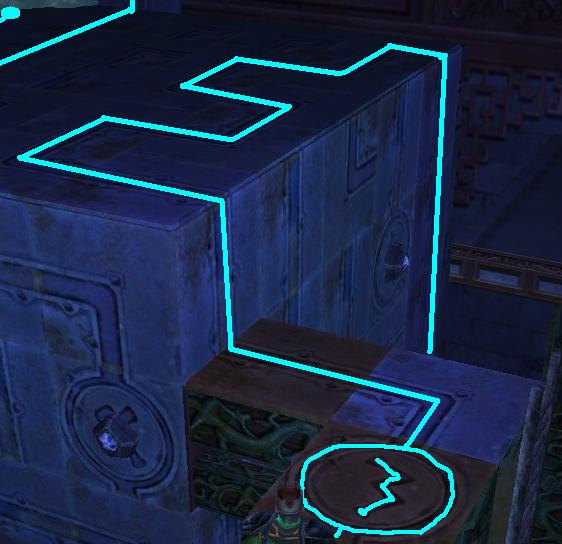
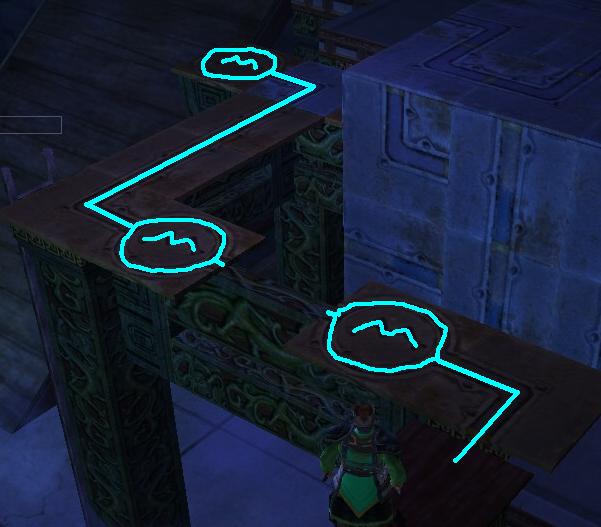
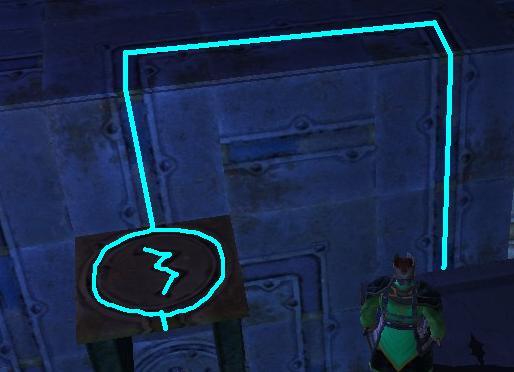
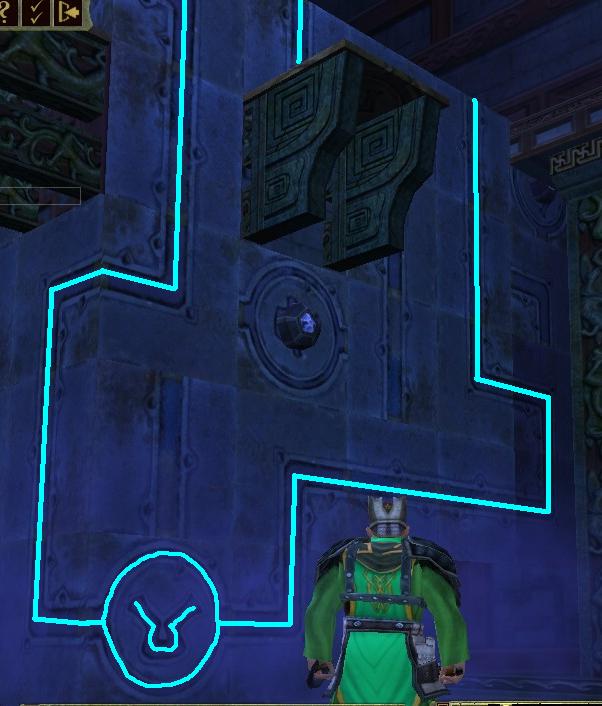
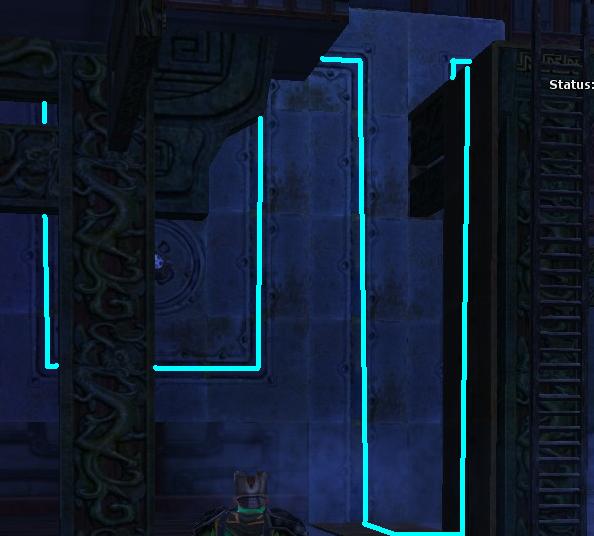
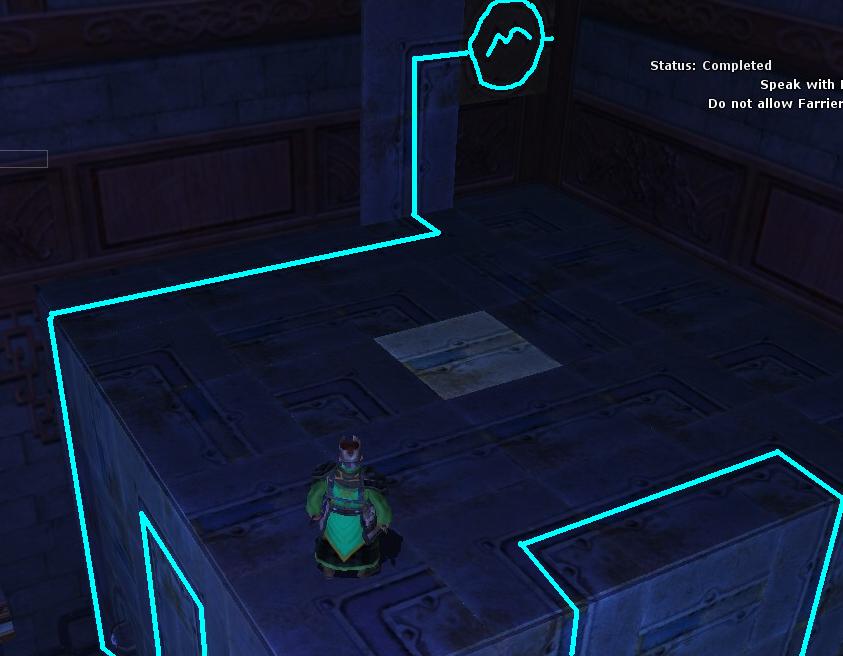
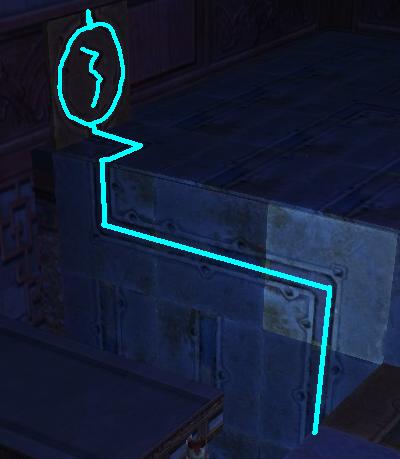
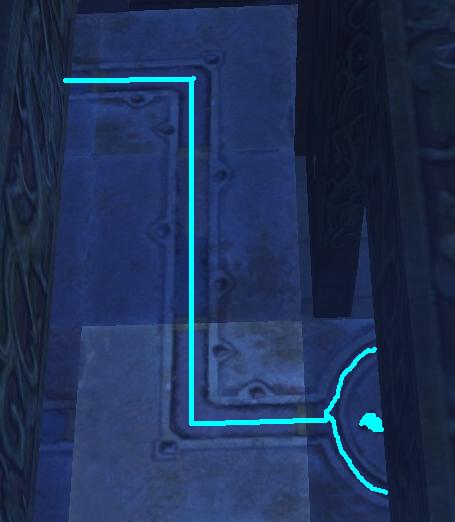
For those tricksy folks though, we have a roguey like sneaky method for getting the gates open without the brute-force, fight-your-way-through, Kargon tactic. At the top of the first ramps, before you head into the buildings, if you turn around you will see the gatehouse. There is a small ledge that a very acrobatic (and magically enhanced) jumper can make their way across to, pull the levers, and then hop back down to the rest of the party. All without alerting the gate guards up-top. Here is a picture. Jump across to the small ledge with the well lit pillar.
Either way, once the gate is open, drop down and head further west. The halls are filled with more small groups of Eladrin, and at the same time you will notice the simultaneous battle the Eladrin are fighting on the opposite path to the north. Continue your path west while and kick the crud outta those goodie-goodies! I mean, go save the agent of The Twelve!
There is a shrine in an alcove to the south before the next large chamber, use it if you you need it, or save it for later. Continue on to an open room split by a large portcullis. Clear out the Eladrin and Earth Elemental guards, then lay down some crowd control and damage in front of the gate, 'cause there is a big fight coming through. Once you are set, pop the lever and hop into the action.
On the other side of the gate, in a small room on the bottom level is a tiny chest on a little table. It is cool and magical, and holds multiple suits of armor and ghost touch tower shields. At least, thats all I ever find in there.
Then head up the ramp to the next gatehouse which will lower the bridge to the west. This gate is guarded by multiple Eladrin, some of which will spawn behind you, others will be up in the gate room. They are lead by a mean paladin named Palin Vance. Take them out and lower the bridge, but don't head that way yet. There is a path on the north side (optional), which leads you back down the hall the devils are coming from. Now you get to kick some evil butt! Head down there and kill the Bearded Devils, close the portal and steal their loot! Or appropriate it for goodness.
Okay, now that the devil threat from that quarter has been subverted, head across the bridge to the west. This will open up a door to the chamber where the "agent of The Twelve" is being held captive. Take out the very very mean red named clerc/pally guy and his two ghaele guards. He self heals a bunch, and has super-searing light, and the ability to teleport around. This is a fight of attrition, so its all about constant dps and staying power.
Once you have killed those mean spirited Eladrin, take a moment to buff up and use the rest shrine in the small side room. The big fight is upcoming. The guy you are "saving" is standing in the big chamber in the middle of the room. Talking to him will trigger the end fight: Him (a big mean tiefling caster), another tiefling arcane, a couple of red named orthons and a red named bearded devil, will all charge the center room. This can be party wipe city, if you don't prepare for it.
So, our usual tactic here:
Before triggering the combat, our entire party will gather in the south tunnel. We lay down some solid/acid fog, maybe some blade barriers, then we send out a fast footed melee to trigger the combat with conversation, then run back south to the party. The Bearded Devil spawns in this room, so be ready for him. He is (in my opinion) the toughest of the badguys, and so good to take down first. The Orthon's and Tieflings will be rushing the center chamber and milling about in the big room while you deal with this chump. Once he is dead, send your runner back out to bring back the next enemy. Wash, rinse, repeat.
The final chest will contain the Shavarath Stone of Battle, a component for flagging for The Shroud raid, and material component for greensteel items. It will also have a chance to drop greensteel components: Glistening Pebbles or Bitterscrub Fungus.
End Reward: Standard Loot Choice. Reward giver, Gretchin Nalberto, is in the Meridia Bar area.Leader of Lost Legions
~Sarlona~
-
03-24-2008, 07:58 PM #11
Ritual Sacrifice
Quest Giver: Quest Entry Point gives the quest. Walkup.
Level: 16 Party
Patron: The Twelve (8/16/24)
Length: Very Long
Entry Point: North Side of the Western cliff in the Southwest portion of the Vale of Twilight. Pic of Route from Meridia
Prereqs: none
Recommended Party: Standard. Jump spell can be handy.
Base Experience: 7,433
Quest Info:
--Creatures: Earth Elementals, Air Elementals, Windlasher Gnolls, Fiendish Gnoll Mystics, Orthons, Bearded Devils, Fiendish Scorpions, Fiendish bats, Fiendish Troglodytes, Bezekira, Red-named Tiefling
--Traps: Trap Rooms filled with earth/air elementals. Not disarmable.
Walkthrough:
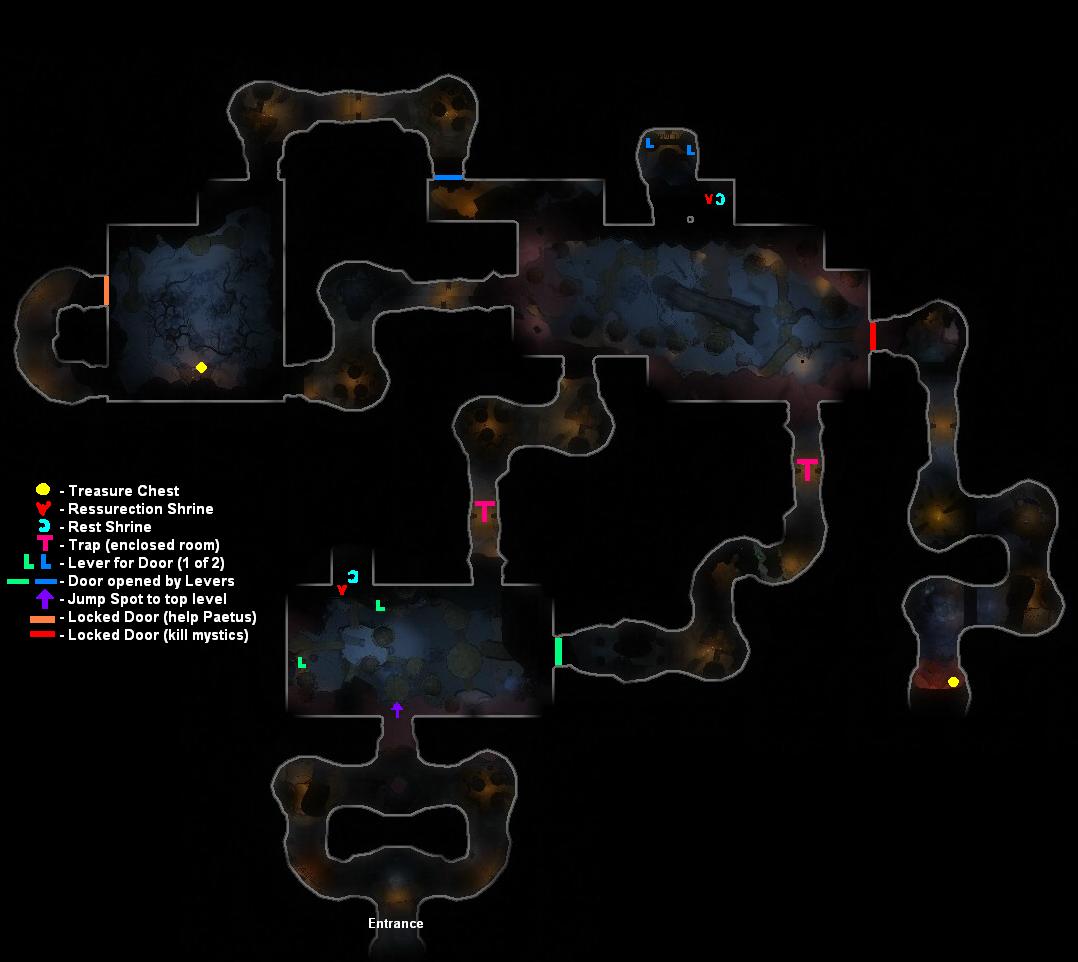
After entering and buffing up (consider including electricity resist and freedom of movement), choose a path up into the windlasher village. Either way, left or right, will circle around to the top. The Windlasher guards out front are formidable. Killerog, the red-named Gnoll, is a beast of a Fighter, with a mean cleave. He is assisted by several archers, healers, casters and earth elementals. One tactic we have used that works well for us is to lay down a few mean blade barriers and/or firewalls, and to kite the mess through the damage, having casters pick off enemy casters/clerics with finger of death.
Once you fight your way into the first area of the village, clear out this lower level, and pick off the archers above. There are two levers, one north, one west, which will open the door to the east. If you are on normal setting, consider jumping up to the top level and using the shrine. By the time you get back up there later in the quest, it will have most likely reset, or be close to resetting. It requires a jump spell. (This is also a great way to get back up later, if someone should fall off the catwalks, rather than running all the way back around.) Edit: Jump spot taken out of game in Mod 7, so you will just have to do without the extra rest.
Once ready, continue east. Clear out the hallway as you go, but be wary when you reach the run lit pillars in this hall. They will close you into a room with air and earth elementals, so be sure you go into this are together. (there are several other halls that look like this, with the runed pillars, but only one more will close on you. I will point it out when we get there. (it is also denoted on the map.)
Past the trapped hallway you fill find yourselves in another large village chamber. There are many gnolls milling about, and sniping from above. There is a large crevasse in the middle of the room, which is bridged by a large log. At the bottom of the crevasse is a small lake, at the north of which is a rest shrine. The ladder to get back up is in the south. on the main level there is a room containing 2 levers, which will open the door to the west. Pull these levers, but be careful of the blue runes on the floor, they will spawn air elementals.
Once ready, travel west to a room where you will find Paetus, member of The Twelve. He rants at you about how he is no longer able to keep a portal to Shavarath closed, and then screams for your aid as the minions of Hell come bounding through. Defeat the increasing difficult waves (bats to scorps with devils to trogs to finally a red-named orthon with his pet bezikiras.). Once done, Paetus will open the way north, and there is a chest where the portal was.
Moving along to the north, you will wind your way up to the upper levels of the village. When you reach the large chamber above the crevasse, a new objective will start. you must find the gnoll mystics maintaining a door to the east. The mystics are spread out amongst this level, and the next level up, which is reached by traveling through the southern hallway. This hallway is also trapped by an elemental room. When through, you will find yourself back in the first main chamber with the first shrine. Clear it out of mystics, shrine if you need, then head back to the previous chamber and finish off any gnoll mystics you may have left behind. Now go east to the now unlocked door and meet up with Paetus.
Once you open this door, Paetus will lead the charge, flinging spells as he goes. he is a pretty sturdy fellow, but you may want to buff him before he goes charging in. I recommend resists, Freedom and Displacement. Follow Paetus into the final hallway, if you are using charms be sure not to charm the mystics! you need to kill the mystics to lower the barriers. Charming air elementals, on the other hand, is great fun. Once you work your way through the barriers and down the hall (checkin on Paetus' health once in awhile), you will reach the final chamber which has a Red-named Tiefling and his two orthon buddies. Deafeat them to finish the quest.
The final chest contains the Shavarath Stone of Might (a material component for greensteel and raid flagging item for the Shroud). It also has a chance to contain Lammanian Lilly Petals and Bitterscrub Fungus.
End Reward: Standard Loot Choice. Reward giver, Lahnden Nacien, is located in the bar in Meridia.Last edited by Lost Leader; 07-28-2008 at 10:57 AM.
Leader of Lost Legions
~Sarlona~
-
03-24-2008, 09:46 PM #12
Let Sleeping Dust Lie
Quest Giver: Quest Entry Point gives the quest. Walkup.
Level: 16 Party
Patron: The Twelve (8/16/24)
Length: Very Long
Entry Point: North Side Meridia under the water, in the Vale of Twilight. Pic of Route from Meridia
Prereqs: none
Recommended Party: A few disarmable traps. More destruction/finger spells means easier to get extra loot.
Base Experience: 7,433
Quest Info:
--Creatures: Ogres, Ogre magi, Dust Mephits, Twilight Rats, Twilight Bats, Rakshasa, Crimson Foot Spiders
--Traps: Spike Traps - Disarmable/Avoidable
Walkthrough:
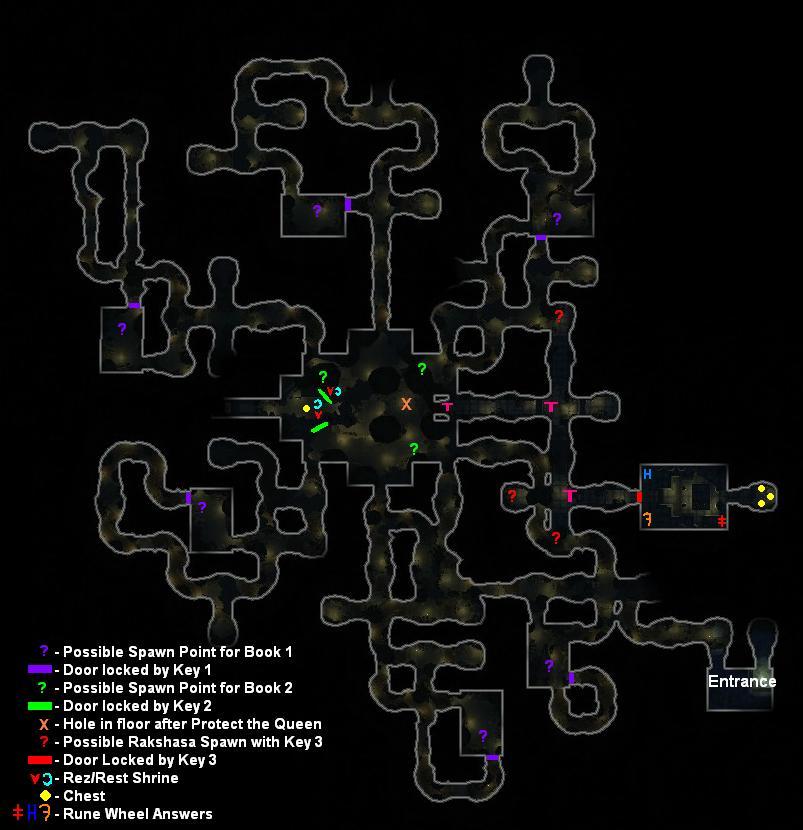
To start this one off, be sure to have some method of underwater breaths, or be a warforged. A short swim is required to get you down into the Spider Lair. The nooks and crannies can be a little difficult to navigate during this swim. I recommend using mouselook mode for the swim. The easiest way to avoid wrong turns and gettin turned about, is to keep going down, and corkscrew to the left when given the opportunity. This will lead you to the entrance to the spider tunnels, where and agent of the Twelve awaits you to ask your help in finding the missing agents.
One thing you don't know yet from the quest information, but you may want the spoiler on, is that the Spiders are being coerced to work for the ogres. If you manage to avoid killing any spiders, you will receive a bonus chest at the end. Additionally, if you manage to kill every ogre magi in the tunnels, you can receive another bonus chest. The spiders in the area of their ogre taskmasters will stop attacking if you kill the nearby ogres. (Reminiscent of Slavers of the Shrieking Mines.) For this reason, Melee's will want to be extra careful, and casters/clerics with insta-kill spells are very nice... if they target carefully.
Head into the tunnels, and begin you search. What you are actually looking for is the Journal of the now-deceased agent. The path will lead you to the main chamber, along the way you will pass a rectangular room. This room is one of the 6 possible spawn points for the first journal. Check there and then head to the center chamber. From the center chamber there are 6 routes you can take to look for the first book. We usually will clear either the NW or SW routes first, as these routes will clear part of the way towards the first shrine.
Once you find the book in one of the 6 possible spawn points, pick it up. This will trigger 2 things. First, the quest objectives panel will change to include the failure note Kill no more than 5 Crimsonfoot Spiders, killing spiders at this point is, obviously, bad. The second thing triggered is an orange-named Ogre Magi with the 1st key will spawn somewhere in the lower tunnels. It seems his spawn location is random, and sometimes it can take a few minutes before he spawns. Search him out and kill him to get the key to access the upper levels.
Using The 1st key, choose any of the 6 paths to search the upper levels for a 2nd journal. Some of the paths will connect to each other. NW and SW connect. S and SE connect. N and NE connect. At each of the connection points in the upper portion of the main chamber, is 1 of the 3 possible spawn points for the 2nd book. at the central point of the NW/SW tunnels is also the first shrine, so you may want to make that your first check.
Once you find the 2nd book, it will trigger another named Ogre Magi to spawn from the Southern Tunnels. he will be holding the key to the Queens Prison, in the central chamber. Kill him and unlock the queens cell.
Moving into the Queens cell will start the Protect the Queen portion of the quest. The queen will charge in to help, as many ogres begin filling the halls to attack you. She is sturdy, but buff her up and keep an eye on her as you kill off the attacking ogre mob. After a few waves of ogres, the red named Rakshasa, Kkomglol (I am not kidding, that's his name), will attack. Kill him to save the queen and advance to the next part of the quest. This also unlocks the chest by the shrine inside the queen's cell.
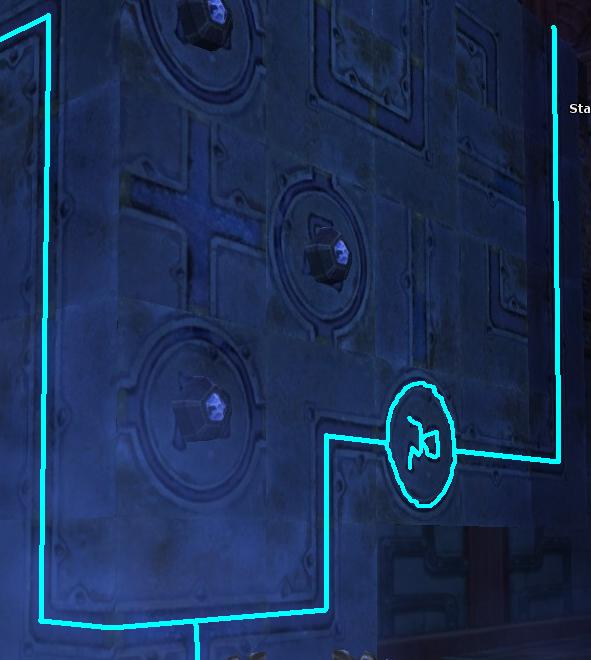
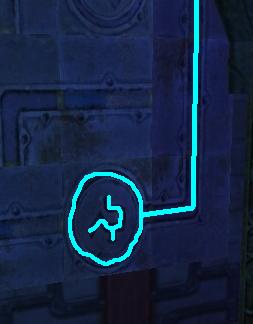
Grab your loot, shrine up if ya want it, and head back to the main chamber, where the weak part of the floor has fallen out during your fight. Drop down, rogue first if you have one, and watch out for the spikes. (there is a lever you can hit if you want to to open the gate behind you back into the main chamber.) There are a couple more spike traps as you progress through the remaining Rakshasa and ogres. take them out and keep an eye out for the named Rakshasa carrying the 3rd key. He has 3 possible spawn points in these lower tunnels. Once you have the key, head into the final room. Clear it out of all the chumps, then set up for the final fight before you lower the barriers and release the badguys. The runewheel combo, as shown on the map, is Red: double cross, Orange: backwards "F", Blue: "H". Watch out for the 4 spiders behind the barrier mixed in with the other badguys.
Acid Fog and Solid Fog are nice to slow things up a bit. Spiders are immune to acid. Our usual tactic is to use Flesh to Stone on the Spiders, pick off the minions with Finger and Destruct, then pull the Rednamed out of the room, or behind the back towards the treasure room, where we can unload on him without worrying about spiders getting in the way of Line of Sight spells. Recommend not using persistent damage spells like Wall of Fire and Blade Barrier, though, because a spider may save and wander over.
now head into the treasure chamber. depending on your optionals completed you will have one, two or three chests!
The main loot chest will drop the Shavarath Stone of Strategy, this is needed to flag for the Shroud raid, and is a material component for greensteel items. It also has a chance to drop greensteel materials: Locust Husk or Chipmunk Funk.
End Reward: Standard Loot Choice. Reward giver, Taaniel Badhri, is located in the Meridia Bar.Last edited by Lost Leader; 03-24-2008 at 11:26 PM.
Leader of Lost Legions
~Sarlona~
-
01-10-2010, 07:23 AM #13Community Member


- Join Date
- Aug 2009
- Posts
- 18
They removed the ledge so this no longer works as described. However, a hasted fvs/monk with wings or abundant step can glide straight to the stone ledge on the left side of your picture. Originally Posted by Lost_Leader

-
12-18-2016, 12:12 PM #14
Originally Posted by FranOhmsford
Originally Posted by Thrudh
Fun part about thread necros is seeing some familiar faces Originally Posted by GlassCannon
Wiki dashboard with some useful stealthplay links. LONG LIVE STEALTH!
Proud Knight of the Silver Legion, Cannith: Saekee (main) and some others typically parked at some level to help guildies and other players
-
12-21-2016, 05:17 PM #15
Word. So this thread was necroed after a few years of gathering dust, so I figured I would do a quick history for nostalgia's sake. Way back in '07 the forum mods decided to hold a contest for player written strategy guides and player guides. At the time there was nothing like this. The ddowiki didn't have a comprehensive quest guide and it was before spyderwolf was making his videos. I decided that this would be a great tool for myself and other players, so I set to it. In the end it took 3rd place in the contest, after SableShadow's Notes of a Dancing Rogue, and MysticTheurge's Ask a Loremaster. We each got the forum title "Scholar Of Adventure" and the other two got some other ingame gifts or something.
Anyways, fast forward a couple years and the mods come up with the compendium. In order to bring more traffic there (or whatever reason) they decided to copy the winning guides to the compendium. But joke was on them, I got an email telling me that there was too much info to move the Lost Quest Guide over to the compendium and it would take too many man hours for them to do it, so this guide wouldn't make it over there. Also the editors over at ddowiki were beginning to get the quests section filled out and the wiki was really becoming the go-to source for that kind of info. While I'd like to think that some of my project here helped them to make that resource better, I know that those folks do a huge amount of work to keep that wiki awesome. Still, I tried to keep this thread going for a bit longer as it was my pet project.
Fast forward a few more years and I'd stopped updating at all really, the wiki crew has more than done a great job filling this niche and I prefer to spend my time playing. Then the ddo forums made a big change in software and all the old links were broken. This guide I think helped quite a few folks over the years, but it is out of date, and I didn't really see a need to spend the hours necessary to fix it all.
So now here we are in the future. DDO has gone thru many devs and ownerships. I am still here and playing, at least from time to time, and I still enjoy the game. I've made some great friends. Have some great memories. I plan to continue that. Cheers to you all! Everybody Drink!Leader of Lost Legions
~Sarlona~
-
07-15-2008, 11:51 AM #16
Unacceptable! I need this on the first page!
/Mwhuahahahahaha!Quest walkthroughs, guides and more on DDM's Realm --> www.ddmsrealm.com - Guides, Tips, and Quest/Magic Item Database! Details here!
Twitter: @DDMs_Realm ~ Like DDM's Realm on Facebook
The Fyxt RPG is out of beta! It combines the ease of digital technology with the fun of tabletop RPGs! Play the Fyxt RPG now for free!
Play Smarter, Not Harder! ~ Karranor
-
07-23-2008, 03:06 PM #17Community Member

- Join Date
- Jan 2006
- Posts
- 158
wow dude, they should give you a free lifetime subscription for this thread
Excellent and EXTREMELY helpful - Thank you!"Burl, scurf, and bower; Birth fern and flower."
Olac Battleforge 16 Paladin || Methil Viddenvelp 10 Sorcerer || Ghorlax 6 Barbarian || Dubi Tiggerwillies 16 Iron Monk build by Illuminati

-
07-23-2008, 03:20 PM #18Community Member

- Join Date
- Jul 2006
- Posts
- 448
The maps would be a lot more complex and detailed if I could get them from inside my head to an actual picture on the interbutts.
I can't wait for a True Neural Interface, where a person can memory dump directly into a file...
Very well done for the equipment granted.
-
07-30-2008, 09:56 PM #19
The Legend of Two Toed Tobias
Quest Giver: Laurent Chastel (outside Salty Wench Tavern in 3 Barrel Cove)
Level: 5 Party
Patron: The Free Agents (4/8/12)
Length: Long
Entry Point: In the water beneath sunken ship in 3 Barrel Cove (Map Here)
Prereqs: none
Recommended Party: Standard. A couple traps, but not unavoidable. Locked chest at end.
Base Experience: 1,220
Quest Info:
--Creatures: bats, rats, skeletons, Wheep
--Traps: Sonic and Fire jets, turned off by valve. Force trap on valve, disarmable
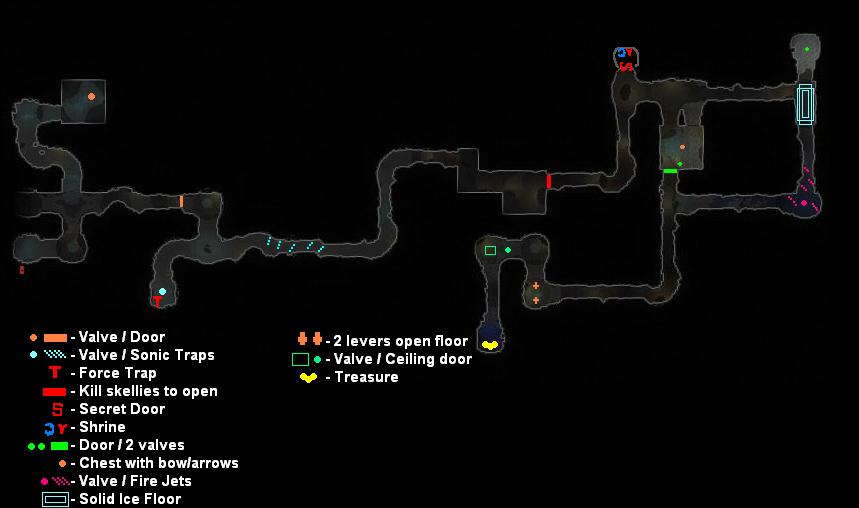
Walkthrough:
First off, it is a good idea to have an underwater item or potions, or be prepared to take off armor for the swims. They aren't too long, but the could kill an unwary or unprepared adventurer.
Begin by traveling to the north first. There is a valve at the end of the hall which will open the caves to the east.
Heading east, the cave branches. Head south first and turn the valve here, but watch out, the valve is sometimes trapped with a force trap. This valve turns off the sonic traps to the east. Once the valve is turned, continue traveling east.
Heading up out of the water, you will reach a closed gate with no lever. You must defeat several waves of skeletons, ending in the crew led by the First Mate, Cervantes. Once all the skeletons are dead the gate will open. Just past the now open gate and up the hall a short ways will be a secret door hiding a shrine.
Now further east the hall will once again branch east and south. Travel south first to enter a large chamber with door at the top and overlooking an old decrepit ship. (There is a chest with bow and arrows on the ship that you will need later to open a doorway if no one has ranged weapons.) Hop down into the water under the ship and find the valve under the doorway above, then find the other path under the water that leads into a cave to the south and circles around to the east. At the end of this swim is another valve in an icy room. When this valve is pulled fire jets will cook the area and melt the ice, opening the passage north. Under the water to the north is the second valve which will open the door we left behind. Climb the ladder up and go west and south back to the room with the door.
Going south through the now open doorway will take you to a room with two levers on opposing sides. Shooting both levers (not necessarily at the same time) will open the floor up to proceed. If you don't have a ranged weapon you can get a free bow and arrows in a chest on the boat in the previous room.
Dropping into the water, hit the valve on the ceiling of the submerged cave, which will open up the ceiling leading to the treasure room of Tobias.
Approaching the treasure will trigger the last fight, as the big mean red named Wheep (hard hitting with an aura of fear) or Two Toed Tobias defends his treasure. After defeating him grab your loot. One of the chests is locked so you will need lockpick or knock to get all the loot.
End reward: standardLast edited by Lost Leader; 07-30-2008 at 10:11 PM.
Leader of Lost Legions
~Sarlona~
-
08-07-2008, 07:20 PM #20
Ghost of a Chance
Quest Giver: Marteen Worley (outside Salty Wench Tavern in 3 Barrel Cove, on shore beneath woodwork)
Level: 5 Party
Patron: The Free Agents (4/8/12)
Length: Long
Entry Point: Underwater to the northwest side of 3 Barrel Cove (Map Here)
Prereqs: none
Recommended Party: Standard. A rogue if you want to try the end puzzle is helpful.
Base Experience: 1,220
Quest Info:
--Creatures: humans, warforged, dogs, spiders, scrag
--Traps: trapped puzzle, not disarmable and optional
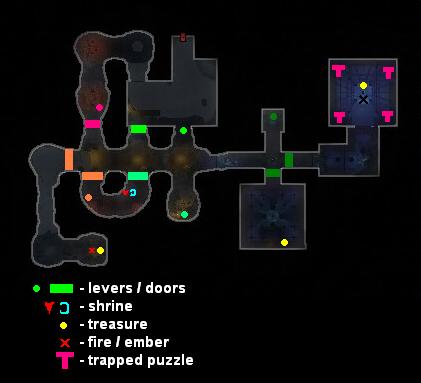
Walkthrough:
Swimming into the underwater cave, you will emerge in a large chamber surrounded by a few pirate archers. Quickly swim to the south where you can climb out of the water and clear the area of pirates.
Most levers throughout the quest require you to clear the areas of badguys to unlock them.
From here there are two ways to go further into the pirates den. There is a lever south which will open up the halls directly, or you can go around through the spider tunnels to the north-west. Both ways will get you where you need to go.
While clearing out the natural halls, you may notice a lever on the back of a statue in a southern room/alcove. This lever opens up a spider tunnel behind you to the west. Traveling into this spider tunnel will reveal a shrine and a lever concealed by webs which will open the underwater gate.
Go through the underwater gate to get to an optional treasure. The submerged caves will lead to an ancient chamber where a Scrag, or sea troll, has set up camp. Remember, scrags can only be killed by fire or acid. So if you do not have an appropriate weapon then grab the smoldering ember off of the fire to land the killing blow. Grab your loot then head back to the pirate tunnels.
Leaving the natural halls and heading into pirate headquarters, you will come to a crossroads with two closed doors. Go north to find the lever that will open both doors.
Now head to the east to find the brother you are supposed to save locked in a cage. He will tell you that you have two choices. One, go back to the room to the south where you can face the pirate captain and get the key to his cage. Two, very carefully use the puzzle to unlock his cage, avoiding sending power to trapped panels which will kill him. Completing the puzzle will also net you an extra chest.
If you went south first and have already killed the captain, you can head back there now to pick up the key. Otherwise you now have the big choice to make. The captain is tough if you are appropriate level, but much faster. The puzzle is convoluted and difficult, but here are some tips and pics to help you through it, should you choose to go the puzzle route.
First off, set the entire puzzle correctly before you send power. You can search out traps if you'd like to, but be sure to remember that trap search only works on the same plane and above you, it is hemispherical, so you will not locate the trapped tiles below you.
I recommend setting the puzzle first, then turning on power, this way you will not inadvertently trigger a trap onto the Worley brother.
Step 1:
Start in the South East. Don't send the power yet, just move the tiles. Just move the tiles so that if you did send the power it would look like the picture, doing a quick loop over the side then sending back up the wall.
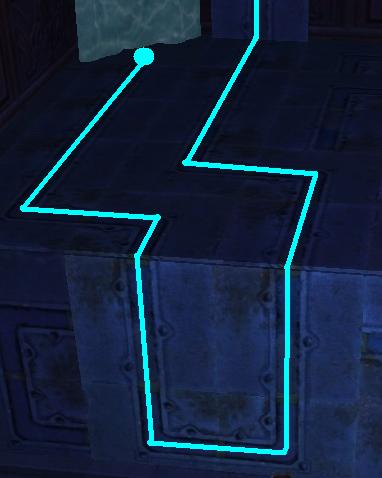
Step 2:
Go to the northeast corner, where the power will later be coming down from above. Set the tiles so that when you turn on the power it will run down the east side of the puzzle, just like in the picture below.
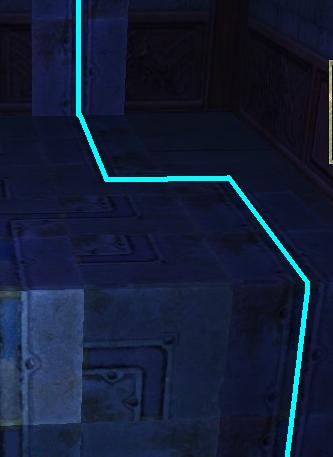
Step 3:
Using the picture below, change the tiles to move the power through the untrapped rune tile. You can rotate this rune tile to move it how you need it to be.
Step 4:
Now send the power around and up to the rune tile shown. This will send the power line back to the southeast corner of the room.
Step 5:
The two pictures below will show you the route to send the power to light the other rune tile needed in the South east. This rune tile will be the second lit lock on the prison of four. It will also send power to the north west side of the room.
Step 6:
Adjust these tiles to look like the picture. This will take the power to the South west side of the room.
Step 7:
The four images below will show you how to place the tiles which will send the power through the correct rune tile and send the power back around to the North West corner.
Step 8:
These last two images will place the power to the final rune tile needed to open the gates to both the brother Worley and to the chest locked up behind him. Once you have all the tiles placed properly just go turn the power on from the South East and watch it work its way around.
End reward: standardLeader of Lost Legions
~Sarlona~


