Ritual Sacrifice
Quest Giver: Quest Entry Point gives the quest. Walkup.
Level: 16 Party
Patron: The Twelve (8/16/24)
Length: Very Long
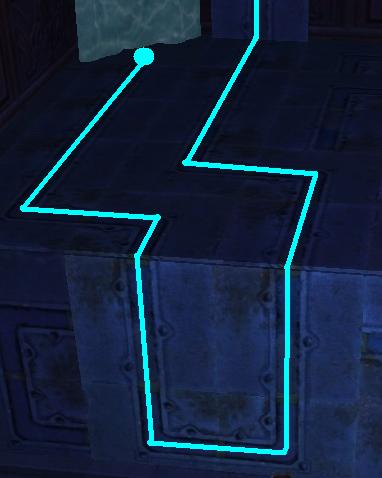
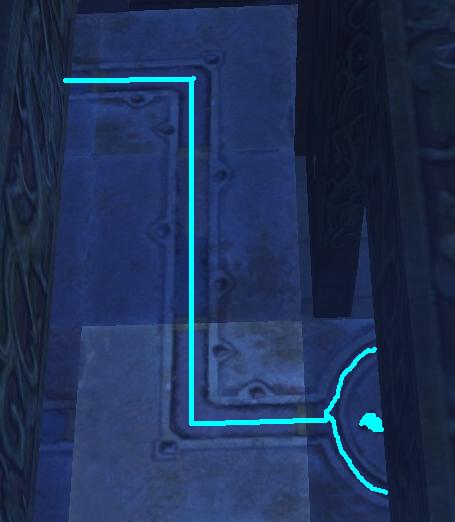
Entry Point: North Side of the Western cliff in the Southwest portion of the Vale of Twilight. Pic of Route from Meridia
Prereqs: none
Recommended Party: Standard. Jump spell can be handy.
Base Experience: 7,433
Quest Info:
--Creatures: Earth Elementals, Air Elementals, Windlasher Gnolls, Fiendish Gnoll Mystics, Orthons, Bearded Devils, Fiendish Scorpions, Fiendish bats, Fiendish Troglodytes, Bezekira, Red-named Tiefling
--Traps: Trap Rooms filled with earth/air elementals. Not disarmable.
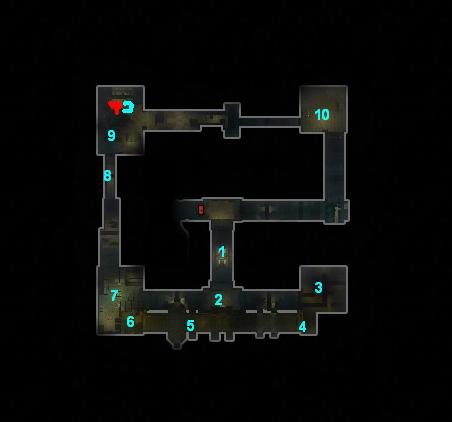
Walkthrough:
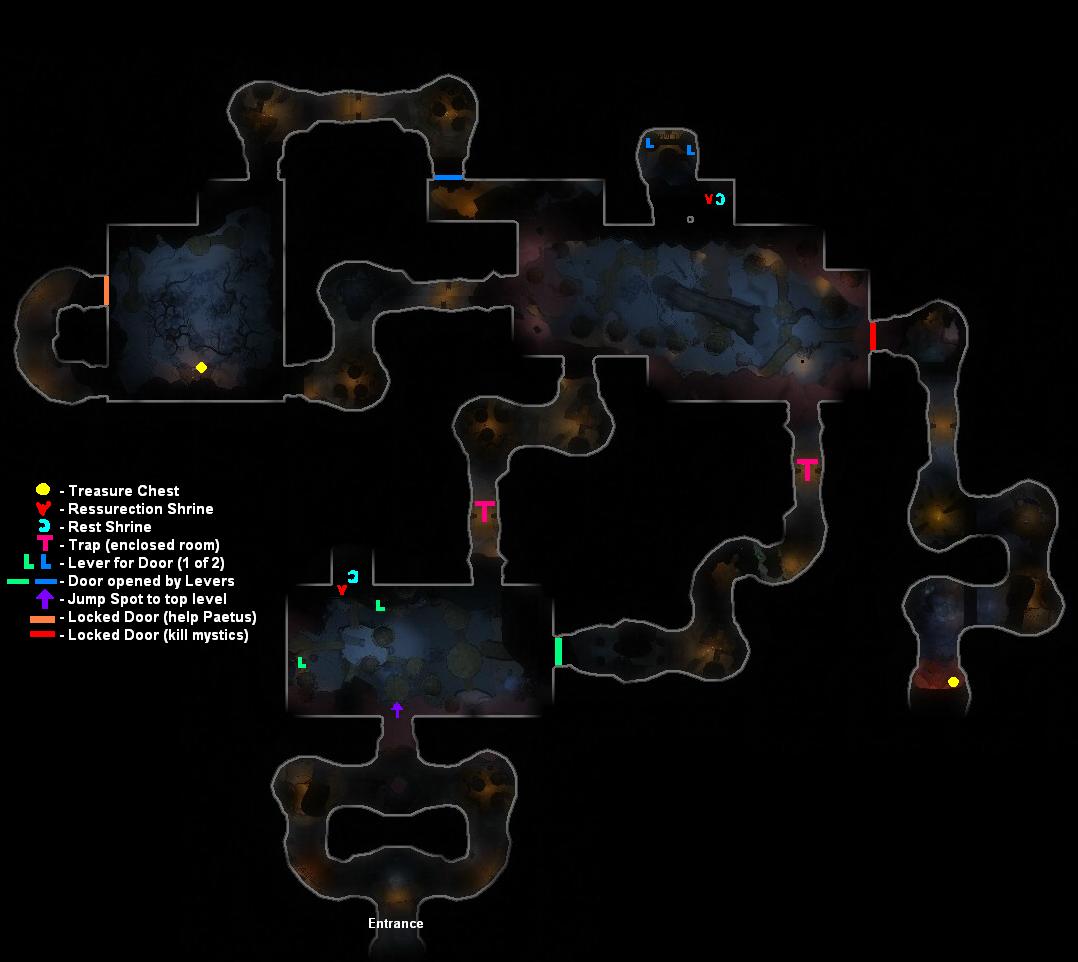
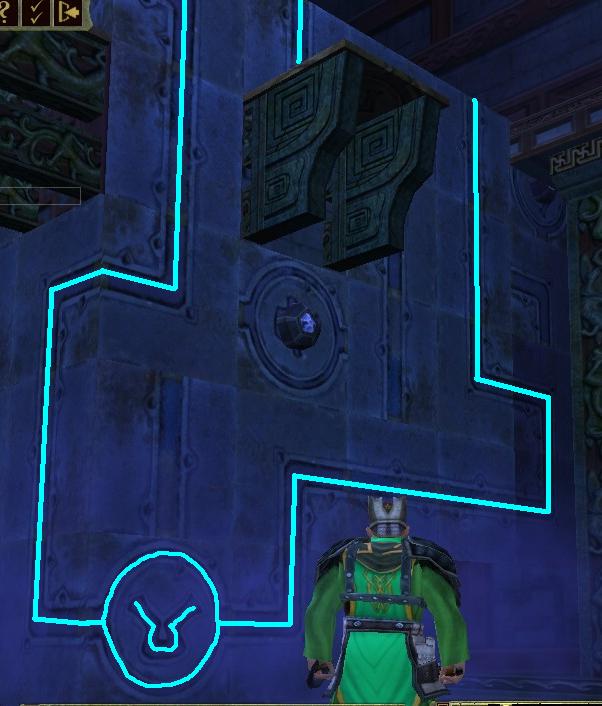
After entering and buffing up (consider including electricity resist and freedom of movement), choose a path up into the windlasher village. Either way, left or right, will circle around to the top. The Windlasher guards out front are formidable. Killerog, the red-named Gnoll, is a beast of a Fighter, with a mean cleave. He is assisted by several archers, healers, casters and earth elementals. One tactic we have used that works well for us is to lay down a few mean blade barriers and/or firewalls, and to kite the mess through the damage, having casters pick off enemy casters/clerics with finger of death.
Once you fight your way into the first area of the village, clear out this lower level, and pick off the archers above. There are two levers, one north, one west, which will open the door to the east. If you are on normal setting, consider jumping up to the top level and using the shrine. By the time you get back up there later in the quest, it will have most likely reset, or be close to resetting. It requires a jump spell. (This is also a great way to get back up later, if someone should fall off the catwalks, rather than running all the way back around.) Edit: Jump spot taken out of game in Mod 7, so you will just have to do without the extra rest.
Once ready, continue east. Clear out the hallway as you go, but be wary when you reach the run lit pillars in this hall. They will close you into a room with air and earth elementals, so be sure you go into this are together. (there are several other halls that look like this, with the runed pillars, but only one more will close on you. I will point it out when we get there. (it is also denoted on the map.)
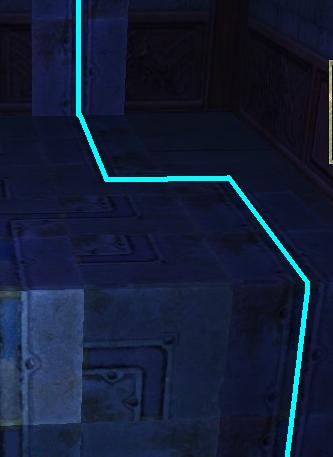
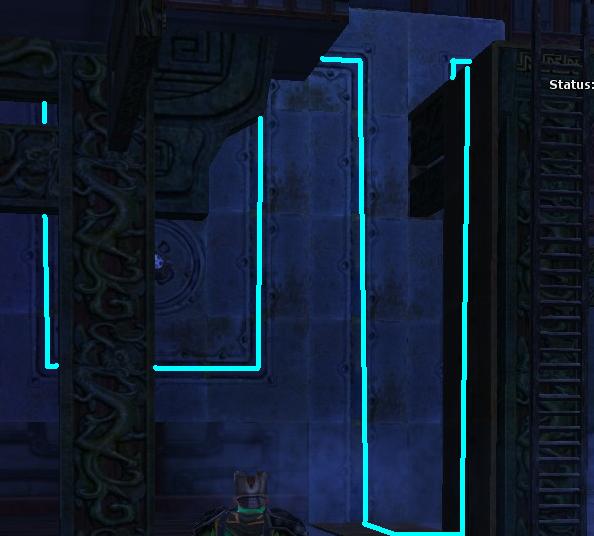
Past the trapped hallway you fill find yourselves in another large village chamber. There are many gnolls milling about, and sniping from above. There is a large crevasse in the middle of the room, which is bridged by a large log. At the bottom of the crevasse is a small lake, at the north of which is a rest shrine. The ladder to get back up is in the south. on the main level there is a room containing 2 levers, which will open the door to the west. Pull these levers, but be careful of the blue runes on the floor, they will spawn air elementals.
Once ready, travel west to a room where you will find Paetus, member of The Twelve. He rants at you about how he is no longer able to keep a portal to Shavarath closed, and then screams for your aid as the minions of Hell come bounding through. Defeat the increasing difficult waves (bats to scorps with devils to trogs to finally a red-named orthon with his pet bezikiras.). Once done, Paetus will open the way north, and there is a chest where the portal was.
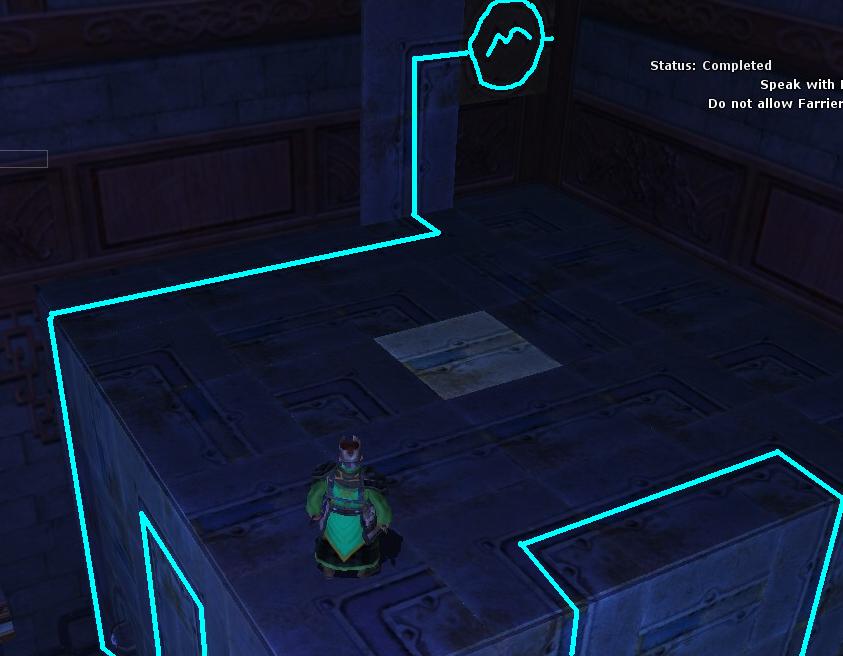
Moving along to the north, you will wind your way up to the upper levels of the village. When you reach the large chamber above the crevasse, a new objective will start. you must find the gnoll mystics maintaining a door to the east. The mystics are spread out amongst this level, and the next level up, which is reached by traveling through the southern hallway. This hallway is also trapped by an elemental room. When through, you will find yourself back in the first main chamber with the first shrine. Clear it out of mystics, shrine if you need, then head back to the previous chamber and finish off any gnoll mystics you may have left behind. Now go east to the now unlocked door and meet up with Paetus.
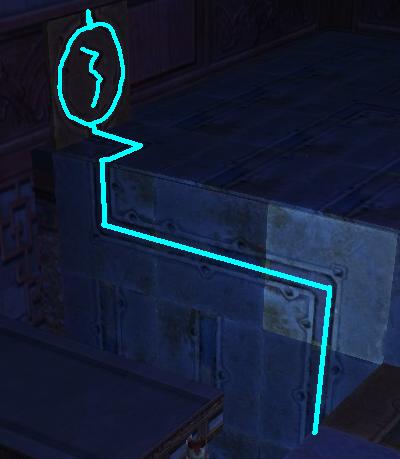
Once you open this door, Paetus will lead the charge, flinging spells as he goes. he is a pretty sturdy fellow, but you may want to buff him before he goes charging in. I recommend resists, Freedom and Displacement. Follow Paetus into the final hallway, if you are using charms be sure not to charm the mystics! you need to kill the mystics to lower the barriers. Charming air elementals, on the other hand, is great fun. Once you work your way through the barriers and down the hall (checkin on Paetus' health once in awhile), you will reach the final chamber which has a Red-named Tiefling and his two orthon buddies. Deafeat them to finish the quest.
The final chest contains the Shavarath Stone of Might (a material component for greensteel and raid flagging item for the Shroud). It also has a chance to contain Lammanian Lilly Petals and Bitterscrub Fungus.
End Reward: Standard Loot Choice. Reward giver, Lahnden Nacien, is located in the bar in Meridia.
Results 221 to 240 of 278
Thread: The Lost Quest Guide
-
03-24-2008, 07:58 PM #221

Last edited by Lost Leader; 07-28-2008 at 10:57 AM.
Leader of Lost Legions
~Sarlona~
-
03-24-2008, 09:46 PM #222
Let Sleeping Dust Lie
Quest Giver: Quest Entry Point gives the quest. Walkup.
Level: 16 Party
Patron: The Twelve (8/16/24)
Length: Very Long
Entry Point: North Side Meridia under the water, in the Vale of Twilight. Pic of Route from Meridia
Prereqs: none
Recommended Party: A few disarmable traps. More destruction/finger spells means easier to get extra loot.
Base Experience: 7,433
Quest Info:
--Creatures: Ogres, Ogre magi, Dust Mephits, Twilight Rats, Twilight Bats, Rakshasa, Crimson Foot Spiders
--Traps: Spike Traps - Disarmable/Avoidable
Walkthrough:
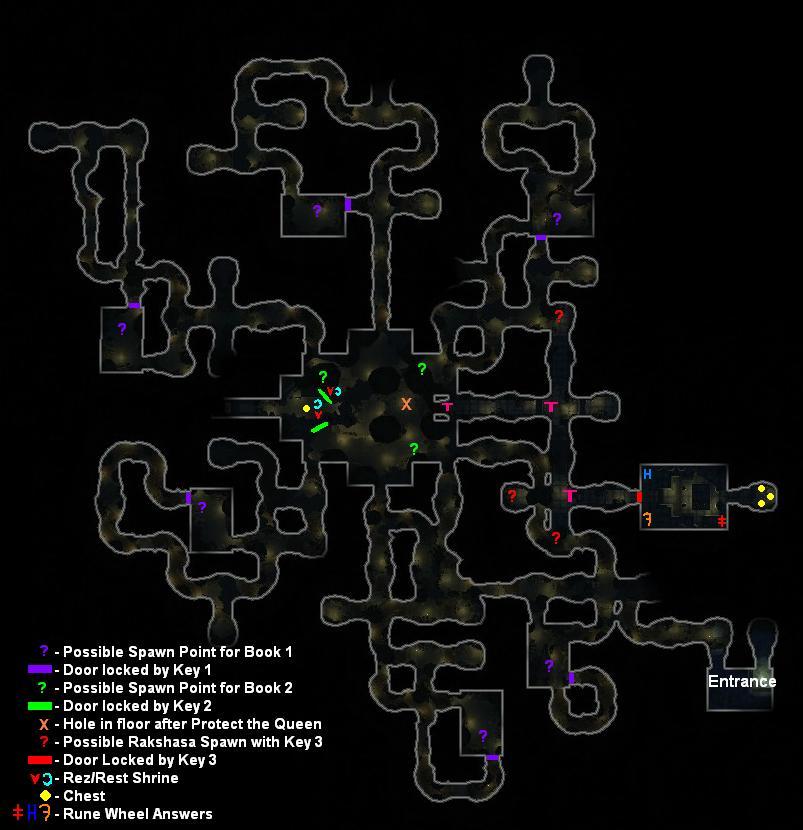
To start this one off, be sure to have some method of underwater breaths, or be a warforged. A short swim is required to get you down into the Spider Lair. The nooks and crannies can be a little difficult to navigate during this swim. I recommend using mouselook mode for the swim. The easiest way to avoid wrong turns and gettin turned about, is to keep going down, and corkscrew to the left when given the opportunity. This will lead you to the entrance to the spider tunnels, where and agent of the Twelve awaits you to ask your help in finding the missing agents.
One thing you don't know yet from the quest information, but you may want the spoiler on, is that the Spiders are being coerced to work for the ogres. If you manage to avoid killing any spiders, you will receive a bonus chest at the end. Additionally, if you manage to kill every ogre magi in the tunnels, you can receive another bonus chest. The spiders in the area of their ogre taskmasters will stop attacking if you kill the nearby ogres. (Reminiscent of Slavers of the Shrieking Mines.) For this reason, Melee's will want to be extra careful, and casters/clerics with insta-kill spells are very nice... if they target carefully.
Head into the tunnels, and begin you search. What you are actually looking for is the Journal of the now-deceased agent. The path will lead you to the main chamber, along the way you will pass a rectangular room. This room is one of the 6 possible spawn points for the first journal. Check there and then head to the center chamber. From the center chamber there are 6 routes you can take to look for the first book. We usually will clear either the NW or SW routes first, as these routes will clear part of the way towards the first shrine.
Once you find the book in one of the 6 possible spawn points, pick it up. This will trigger 2 things. First, the quest objectives panel will change to include the failure note Kill no more than 5 Crimsonfoot Spiders, killing spiders at this point is, obviously, bad. The second thing triggered is an orange-named Ogre Magi with the 1st key will spawn somewhere in the lower tunnels. It seems his spawn location is random, and sometimes it can take a few minutes before he spawns. Search him out and kill him to get the key to access the upper levels.
Using The 1st key, choose any of the 6 paths to search the upper levels for a 2nd journal. Some of the paths will connect to each other. NW and SW connect. S and SE connect. N and NE connect. At each of the connection points in the upper portion of the main chamber, is 1 of the 3 possible spawn points for the 2nd book. at the central point of the NW/SW tunnels is also the first shrine, so you may want to make that your first check.
Once you find the 2nd book, it will trigger another named Ogre Magi to spawn from the Southern Tunnels. he will be holding the key to the Queens Prison, in the central chamber. Kill him and unlock the queens cell.
Moving into the Queens cell will start the Protect the Queen portion of the quest. The queen will charge in to help, as many ogres begin filling the halls to attack you. She is sturdy, but buff her up and keep an eye on her as you kill off the attacking ogre mob. After a few waves of ogres, the red named Rakshasa, Kkomglol (I am not kidding, that's his name), will attack. Kill him to save the queen and advance to the next part of the quest. This also unlocks the chest by the shrine inside the queen's cell.
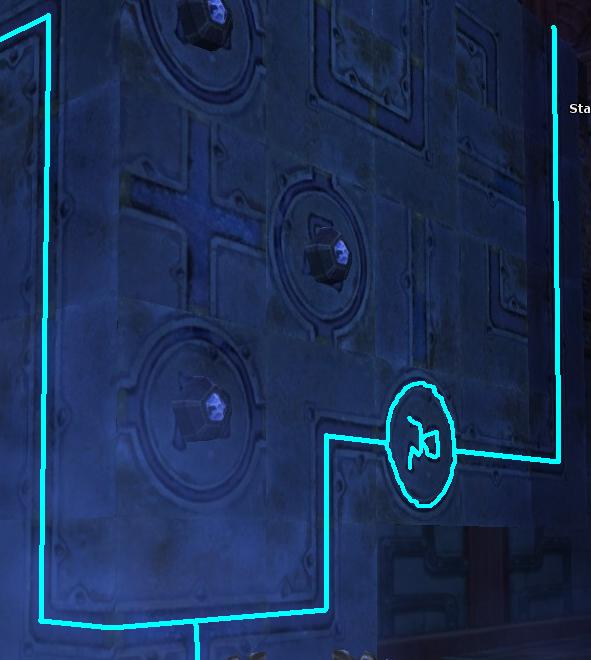
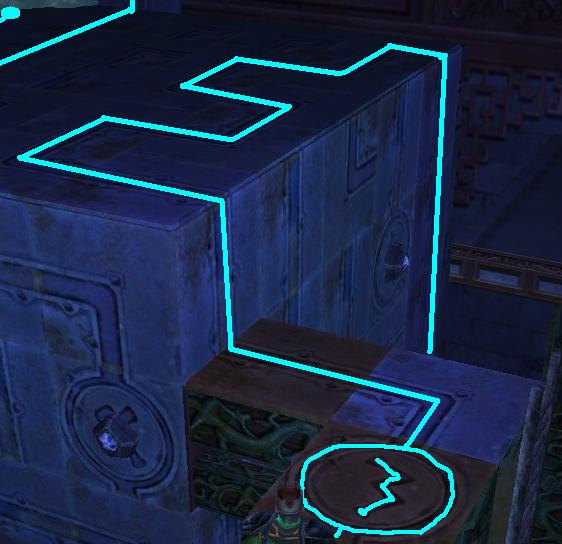
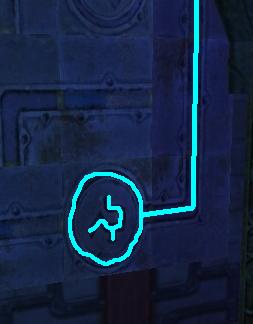
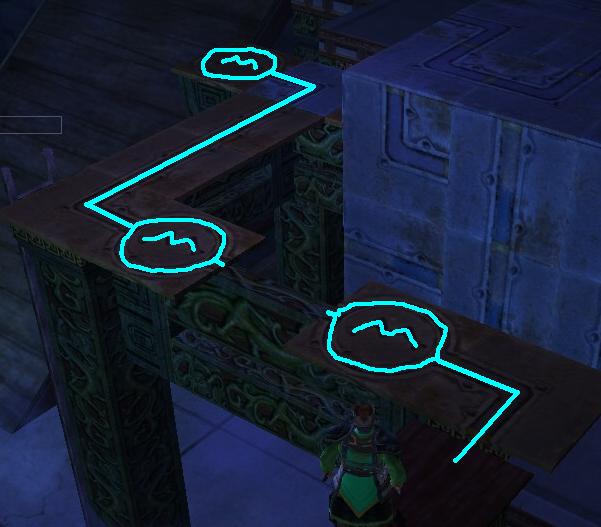
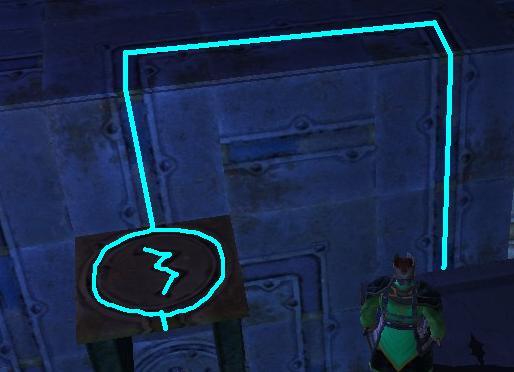
Grab your loot, shrine up if ya want it, and head back to the main chamber, where the weak part of the floor has fallen out during your fight. Drop down, rogue first if you have one, and watch out for the spikes. (there is a lever you can hit if you want to to open the gate behind you back into the main chamber.) There are a couple more spike traps as you progress through the remaining Rakshasa and ogres. take them out and keep an eye out for the named Rakshasa carrying the 3rd key. He has 3 possible spawn points in these lower tunnels. Once you have the key, head into the final room. Clear it out of all the chumps, then set up for the final fight before you lower the barriers and release the badguys. The runewheel combo, as shown on the map, is Red: double cross, Orange: backwards "F", Blue: "H". Watch out for the 4 spiders behind the barrier mixed in with the other badguys.
Acid Fog and Solid Fog are nice to slow things up a bit. Spiders are immune to acid. Our usual tactic is to use Flesh to Stone on the Spiders, pick off the minions with Finger and Destruct, then pull the Rednamed out of the room, or behind the back towards the treasure room, where we can unload on him without worrying about spiders getting in the way of Line of Sight spells. Recommend not using persistent damage spells like Wall of Fire and Blade Barrier, though, because a spider may save and wander over.
now head into the treasure chamber. depending on your optionals completed you will have one, two or three chests!
The main loot chest will drop the Shavarath Stone of Strategy, this is needed to flag for the Shroud raid, and is a material component for greensteel items. It also has a chance to drop greensteel materials: Locust Husk or Chipmunk Funk.
End Reward: Standard Loot Choice. Reward giver, Taaniel Badhri, is located in the Meridia Bar.Last edited by Lost Leader; 03-24-2008 at 11:26 PM.
Leader of Lost Legions
~Sarlona~
-
07-15-2008, 11:51 AM #223
Unacceptable! I need this on the first page!
/Mwhuahahahahaha!Quest walkthroughs, guides and more on DDM's Realm --> www.ddmsrealm.com - Guides, Tips, and Quest/Magic Item Database! Details here!
Twitter: @DDMs_Realm ~ Like DDM's Realm on Facebook
The Fyxt RPG is out of beta! It combines the ease of digital technology with the fun of tabletop RPGs! Play the Fyxt RPG now for free!
Play Smarter, Not Harder! ~ Karranor
-
07-23-2008, 03:06 PM #224Community Member


- Join Date
- Jan 2006
- Posts
- 158
wow dude, they should give you a free lifetime subscription for this thread
Excellent and EXTREMELY helpful - Thank you!"Burl, scurf, and bower; Birth fern and flower."
Olac Battleforge 16 Paladin || Methil Viddenvelp 10 Sorcerer || Ghorlax 6 Barbarian || Dubi Tiggerwillies 16 Iron Monk build by Illuminati

-
07-23-2008, 03:20 PM #225Community Member


- Join Date
- Jul 2006
- Posts
- 448
The maps would be a lot more complex and detailed if I could get them from inside my head to an actual picture on the interbutts.
I can't wait for a True Neural Interface, where a person can memory dump directly into a file...
Very well done for the equipment granted.
-
07-30-2008, 09:56 PM #226
The Legend of Two Toed Tobias
Quest Giver: Laurent Chastel (outside Salty Wench Tavern in 3 Barrel Cove)
Level: 5 Party
Patron: The Free Agents (4/8/12)
Length: Long
Entry Point: In the water beneath sunken ship in 3 Barrel Cove (Map Here)
Prereqs: none
Recommended Party: Standard. A couple traps, but not unavoidable. Locked chest at end.
Base Experience: 1,220
Quest Info:
--Creatures: bats, rats, skeletons, Wheep
--Traps: Sonic and Fire jets, turned off by valve. Force trap on valve, disarmable
Walkthrough:
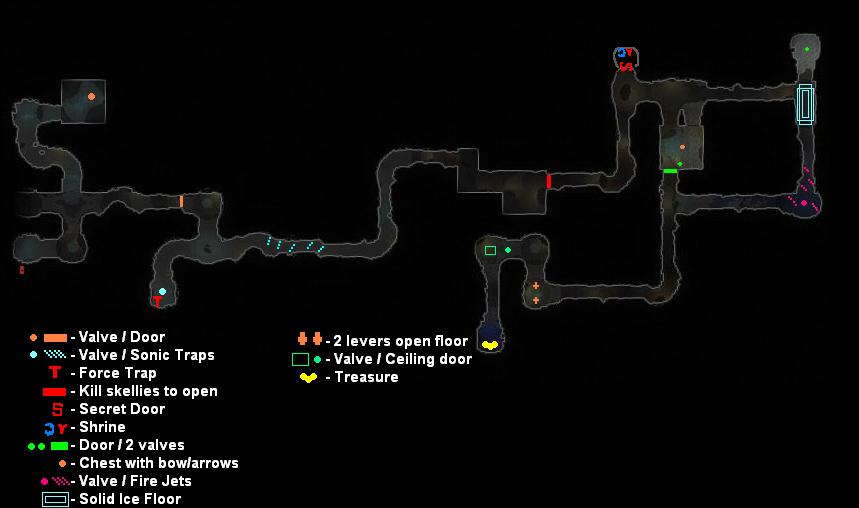
First off, it is a good idea to have an underwater item or potions, or be prepared to take off armor for the swims. They aren't too long, but the could kill an unwary or unprepared adventurer.
Begin by traveling to the north first. There is a valve at the end of the hall which will open the caves to the east.
Heading east, the cave branches. Head south first and turn the valve here, but watch out, the valve is sometimes trapped with a force trap. This valve turns off the sonic traps to the east. Once the valve is turned, continue traveling east.
Heading up out of the water, you will reach a closed gate with no lever. You must defeat several waves of skeletons, ending in the crew led by the First Mate, Cervantes. Once all the skeletons are dead the gate will open. Just past the now open gate and up the hall a short ways will be a secret door hiding a shrine.
Now further east the hall will once again branch east and south. Travel south first to enter a large chamber with door at the top and overlooking an old decrepit ship. (There is a chest with bow and arrows on the ship that you will need later to open a doorway if no one has ranged weapons.) Hop down into the water under the ship and find the valve under the doorway above, then find the other path under the water that leads into a cave to the south and circles around to the east. At the end of this swim is another valve in an icy room. When this valve is pulled fire jets will cook the area and melt the ice, opening the passage north. Under the water to the north is the second valve which will open the door we left behind. Climb the ladder up and go west and south back to the room with the door.
Going south through the now open doorway will take you to a room with two levers on opposing sides. Shooting both levers (not necessarily at the same time) will open the floor up to proceed. If you don't have a ranged weapon you can get a free bow and arrows in a chest on the boat in the previous room.
Dropping into the water, hit the valve on the ceiling of the submerged cave, which will open up the ceiling leading to the treasure room of Tobias.
Approaching the treasure will trigger the last fight, as the big mean red named Wheep (hard hitting with an aura of fear) or Two Toed Tobias defends his treasure. After defeating him grab your loot. One of the chests is locked so you will need lockpick or knock to get all the loot.
End reward: standardLast edited by Lost Leader; 07-30-2008 at 10:11 PM.
Leader of Lost Legions
~Sarlona~
-
08-07-2008, 07:20 PM #227
Ghost of a Chance
Quest Giver: Marteen Worley (outside Salty Wench Tavern in 3 Barrel Cove, on shore beneath woodwork)
Level: 5 Party
Patron: The Free Agents (4/8/12)
Length: Long
Entry Point: Underwater to the northwest side of 3 Barrel Cove (Map Here)
Prereqs: none
Recommended Party: Standard. A rogue if you want to try the end puzzle is helpful.
Base Experience: 1,220
Quest Info:
--Creatures: humans, warforged, dogs, spiders, scrag
--Traps: trapped puzzle, not disarmable and optional
Walkthrough:
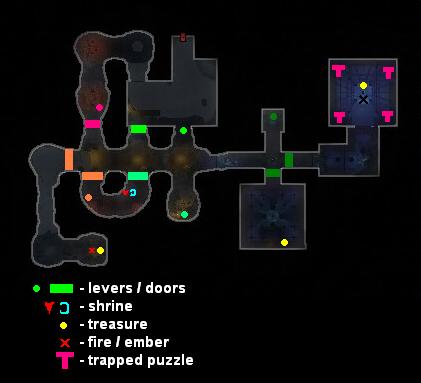
Swimming into the underwater cave, you will emerge in a large chamber surrounded by a few pirate archers. Quickly swim to the south where you can climb out of the water and clear the area of pirates.
Most levers throughout the quest require you to clear the areas of badguys to unlock them.
From here there are two ways to go further into the pirates den. There is a lever south which will open up the halls directly, or you can go around through the spider tunnels to the north-west. Both ways will get you where you need to go.
While clearing out the natural halls, you may notice a lever on the back of a statue in a southern room/alcove. This lever opens up a spider tunnel behind you to the west. Traveling into this spider tunnel will reveal a shrine and a lever concealed by webs which will open the underwater gate.
Go through the underwater gate to get to an optional treasure. The submerged caves will lead to an ancient chamber where a Scrag, or sea troll, has set up camp. Remember, scrags can only be killed by fire or acid. So if you do not have an appropriate weapon then grab the smoldering ember off of the fire to land the killing blow. Grab your loot then head back to the pirate tunnels.
Leaving the natural halls and heading into pirate headquarters, you will come to a crossroads with two closed doors. Go north to find the lever that will open both doors.
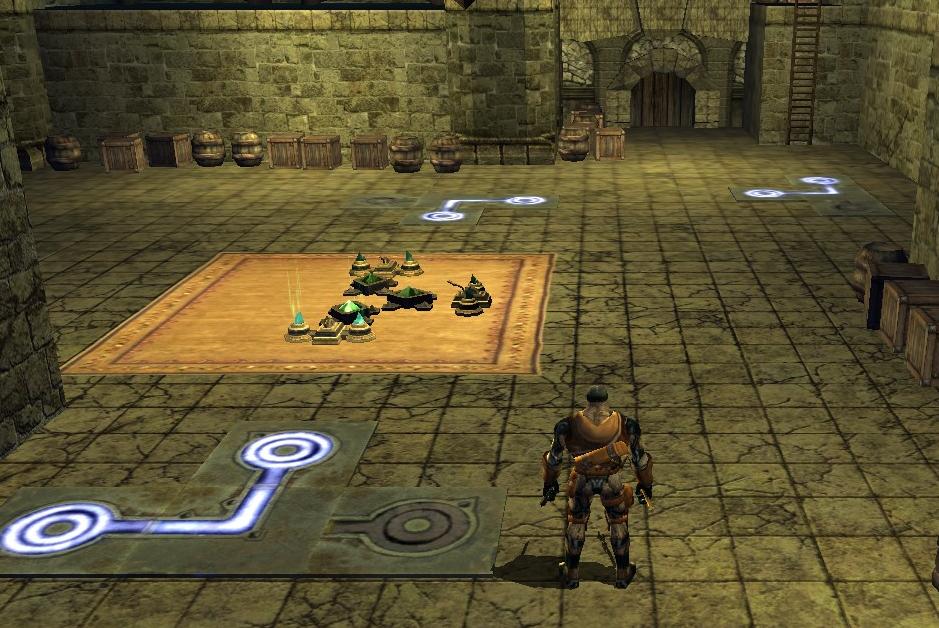
Now head to the east to find the brother you are supposed to save locked in a cage. He will tell you that you have two choices. One, go back to the room to the south where you can face the pirate captain and get the key to his cage. Two, very carefully use the puzzle to unlock his cage, avoiding sending power to trapped panels which will kill him. Completing the puzzle will also net you an extra chest.
If you went south first and have already killed the captain, you can head back there now to pick up the key. Otherwise you now have the big choice to make. The captain is tough if you are appropriate level, but much faster. The puzzle is convoluted and difficult, but here are some tips and pics to help you through it, should you choose to go the puzzle route.
First off, set the entire puzzle correctly before you send power. You can search out traps if you'd like to, but be sure to remember that trap search only works on the same plane and above you, it is hemispherical, so you will not locate the trapped tiles below you.
I recommend setting the puzzle first, then turning on power, this way you will not inadvertently trigger a trap onto the Worley brother.
Step 1:
Start in the South East. Don't send the power yet, just move the tiles. Just move the tiles so that if you did send the power it would look like the picture, doing a quick loop over the side then sending back up the wall.
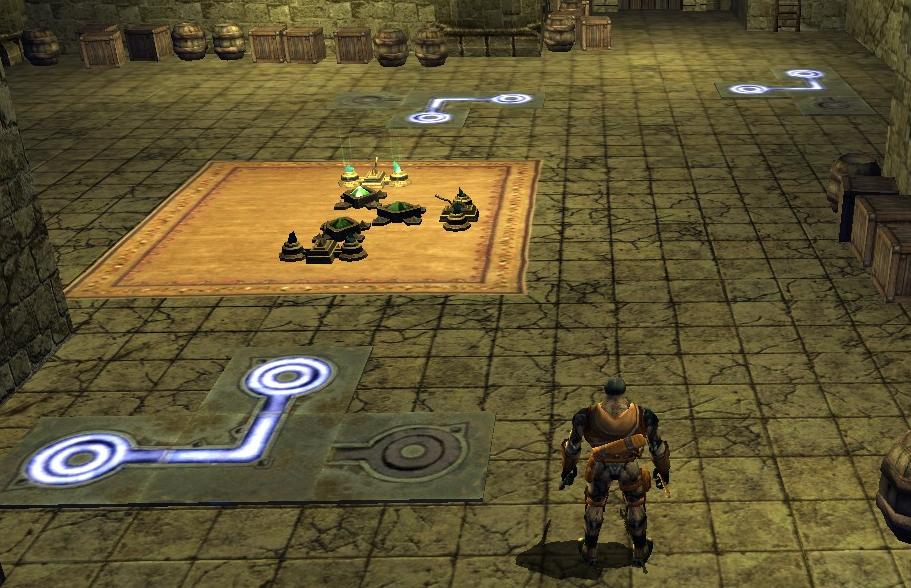
Step 2:
Go to the northeast corner, where the power will later be coming down from above. Set the tiles so that when you turn on the power it will run down the east side of the puzzle, just like in the picture below.
Step 3:
Using the picture below, change the tiles to move the power through the untrapped rune tile. You can rotate this rune tile to move it how you need it to be.
Step 4:
Now send the power around and up to the rune tile shown. This will send the power line back to the southeast corner of the room.
Step 5:
The two pictures below will show you the route to send the power to light the other rune tile needed in the South east. This rune tile will be the second lit lock on the prison of four. It will also send power to the north west side of the room.
Step 6:
Adjust these tiles to look like the picture. This will take the power to the South west side of the room.
Step 7:
The four images below will show you how to place the tiles which will send the power through the correct rune tile and send the power back around to the North West corner.
Step 8:
These last two images will place the power to the final rune tile needed to open the gates to both the brother Worley and to the chest locked up behind him. Once you have all the tiles placed properly just go turn the power on from the South East and watch it work its way around.
End reward: standardLeader of Lost Legions
~Sarlona~
-
08-08-2008, 06:08 AM #228
Prove Your Worth (a.k.a. Rackam's Trial)
Quest Giver: Dirty Vingus (outside Salty Wench Tavern in 3 Barrel Cove)
Level: 5 Party
Patron: The Free Agents (3/6/9)
Length: Medium
Entry Point: Central area of 3 Barrel Cove, just west of the nose-diving ship, The Lucky Lady (Map Here)
Prereqs: none
Recommended Party: Standard. Evasion/rogue is a plus.
Base Experience: 921
Quest Info:
--Creatures: iron defender (construct), warforged
--Traps: fire, darts, spikes, blades
Walkthrough:
Step 1:
Avoid the traps. Spikes up top, sweeping blades on the sides. There are safe, jump-able paths on the sides of the spikes up top.
Step 2:
Survive the ambush. Defeat four Iron Defenders.
Step 3:
Navigate the halls through the Iron defenders to reach the Agility Trial.
Step 4:
Navigate the Agility Trial. Climb up the ladders, switching ladders mid-climb to reach the top. The best way I have found to do this is climb to the top of a ladder, then hold down the left mouse button to toggle into mouse look mode. Move the target reticule to the direction of the ladder you want to jump on. Jump off while still facing the way you want to go in mouse look mode and your characters will immediately face the direction you want him/her to.
Step 5:
Survive the Warforged Ambush. Defeat the 4 warforged to continue on.
Step 6:
Maneuver down the descent. Very simple with feather fall. Just jump on down and float to the bottom. Lacking feather fall, take your time and watch where you drop down to.
Step 7:
Solve Rackam's Conundrum. First place the floor tiles into the position shown in the picture below. Then select the northern most of the center green levers. Now go to the levers to the east and pull the one next to the red signal crystal. THis will fire a dart which will lower a barrier on the ceiling allowing the next step.
Pull the green east lever to reset the puzzle.
Now in the center select the southern most lever. Shown in the 2nd picture below. Now once again pull the red lever to the east. This will open the path north.
Step 8:
Defeat Old Iron Sides, a large mini-boss Iron Defender.
Step 9:
Navigate through the Inferno. There is a lever on the NW wall that will turn off some of the flames, the lever on the NE wall will open the gate to the east and complete this portion of the Trial's.
Step 10:
Answer first mate Penzant's questions.
Question 1:
When we plunder an innocent's ship, what be the first thing ya ortin' to do?
A) Run for the loot as quick as ya can.
B) Yarrrrr (bluff check)
C) Take a head count of your crew
Question 2:
When arrivin to a new port, what does a pirate seek out first?
A) Yaarrrrrr (bluff check)
B) The prison, so ye know where yer mates'll end up
C) The tavern!
Question 3:
How much share does the cap'n receive?
A) Double th' share o' a crewmate
B) Yaaarrrr. (bluff check)
C) The same as th' rest o' th' crew
Question 4:
Are ye wantin' a swashbuckle?!
A) Yaarrrr! (bluff check)
B) No, canna we talk about it?
C) ye bet I be lookin fer a swashbuckle!
It doesn't really matter how you answer the questions, either way you will have a short fight at the end of the questions and then be forced with a final choice. Make the kobold walk the plank or let him go.
Choice A: Walk the Plank! Successfully ends the quest.
Choice B: Free the kobold. Starts another fight with First mate and all his cronies. Defeat them all, get the crimson key and escape through a final trap room to complete the quest.
Quest Reward: standardLast edited by Lost Leader; 08-09-2008 at 02:54 AM.
Leader of Lost Legions
~Sarlona~
-
10-29-2008, 04:10 PM #229
Enter the Kobold
Quest Giver: Stormreaver
Level: 17 Party
Patron:
Length: Very Long
Entry Point: Top of the Volcano in western explorer zone.
Prereqs: none
Recommended Party:
Base Experience: 8,835
Quest Info:
--Creatures: kobolds, night wolves, paragon kobolds
--Traps: falling floor, pit with spikes
Walkthrough:
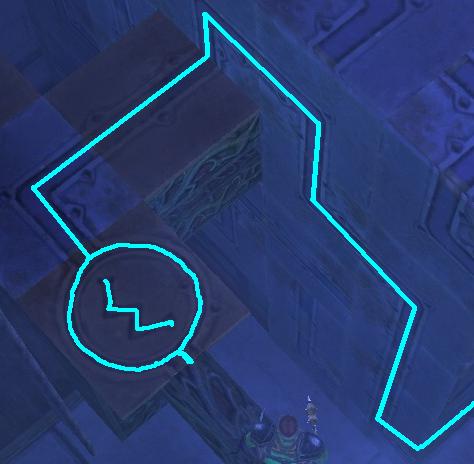
It will be a few days before the complete walkthrough is up, but I wanted to share some spoilers for the Kobold Gauntlet if you are having a tough time getting through.
The goal is to have all the floor lights turned on. The little teleportation stones will move you like a knight on a chess board. There is a chest in the puzzle after it finishes.
Lil pic to help visualize a way through:
Okay, back to questing! New stuff, YAY!Last edited by Lost Leader; 10-29-2008 at 06:27 PM.
Leader of Lost Legions
~Sarlona~
-
10-29-2008, 04:13 PM #230
Level 17 Quests
Enter the Kobold
Monastery of the Scorpion
Prey on the Hunter
Stealer of Souls
The ShroudLast edited by Lost_Leader; 10-29-2009 at 07:57 AM.
Leader of Lost Legions
~Sarlona~
-
10-29-2008, 05:12 PM #231
Level 18 Quests
A Vision of Destruction
Hound of Xoriat
Leader of Lost Legions
~Sarlona~
-
01-28-2009, 12:03 AM #232Community Member
- Join Date
- Feb 2006
- Posts
- 584
Thanks for the useful thread!
-
01-28-2009, 01:34 AM #233Community Member

- Join Date
- Apr 2007
- Posts
- 105
this post is still usefull and i just dont want it to be flushed in a stupid purge.. thanx

X DDO QUÉBEC X
-
01-28-2009, 04:10 PM #234Community Member

- Join Date
- May 2007
- Posts
- 114
/aye
~Davinna~Davinnah~Davinnity~Davnys~Davenchy~Dominn ae~
~Inferus Sus~Thelanis~
-
01-28-2009, 05:19 PM #235Community Member

- Join Date
- Mar 2006
- Posts
- 178
Gianthold relics
For a while the Rare / Named chests in GH were also dropping relics. I know the drop rate dropped significantly, but I don't know if it's been eliminated completely.
-
02-06-2009, 06:53 AM #236Community Member

- Join Date
- Oct 2008
- Posts
- 97
This should be a sticky!
-
02-08-2009, 03:30 PM #237Community Member

- Join Date
- Jan 2008
- Posts
- 0
90day post
 Originally Posted by Tarrant

-
03-21-2009, 11:49 AM #238Community Member

- Join Date
- Feb 2008
- Posts
- 284
 Quest Guide for the Lost
Thanks for these guides! They're great for me as I'm still a noob, even with a lvl 13 toon.
You might want to add information on the Voice of the Master end reward to the Thrall of the Necromancer guide.Why not invite your spouse to play?
-
04-13-2009, 05:12 PM #239Founder

- Join Date
- Jan 2006
- Posts
- 25
Relics in GH Explorer Chests
I read this post and ran right out to Ogh. His chest dropped 1 relic for me. Of course the next 4 times I got none, but I can confirm that they still do drop in the explorer rare encounter chests. Originally Posted by SqtYork
To hunt beside a brother is the best of times.
-
04-21-2009, 11:31 PM #240Community Member

- Join Date
- Mar 2006
- Posts
- 143
Wow, great post, very useful! Can't believe I just ran into this.
Fear my long winded posts! (all who read them beware!)
Characters -all on Khyber main characters- Sorc 17, barb 10, sorc 6