

Welcome to Korthos Island and the New Player Experience!
If this is your first character ever, or your first character on a new server, you will need to complete the entire Korthos Island quest sequence before you can leave the island and head to the city of Stormreach. In addition, you will only be able to group with others who are also brand new characters and have not yet completed the quest series.
If you have already completed this sequence on any character on the server you are currently playing, the first NPC you speak with will give you the option of skipping the tutorial. There are two things to consider:
- if you choose not to skip the tutorial here, you do not get another chance. (Note: this is expected to change for module 9)
- the tutorial version of Korthos is separate from the rest of the game and can't be reached from elsewhere in the game. You can't get to Stormreach until you've completed Misery's Peak.
While the quest chain isn't listed as such, the breakdown is as follows:
Tutorial (can be skipped if you have done it before)
Heyton's Rest (Level 1)
The Storehouse's Secret (Level 1)
The Cannith Crystal (Level 1)
The Collaborator (Level 1)
Redemption (Level 1)
Misery's Peak (Level 1)
The first three after the tutorial (Heyton's Rest, The Storehouse's Secret and The Cannith Crystal) can be completed in any order. All three must be complete before Sigmund will offer The Collaborator. You must complete The Collaborator before you will allowed to explore the outdoor area of Korthos Island.
Results 241 to 260 of 278
Thread: The Lost Quest Guide
-
05-03-2009, 09:29 PM #241

Last edited by Lost Leader; 05-03-2009 at 09:32 PM.
Leader of Lost Legions
~Sarlona~
-
05-03-2009, 09:31 PM #242
Shipwreck Shore
(Tutorial, Part 0)
Quest Giver: Automatic on entering
Level: 1 (Solo)
Patron: No patron or favor.
Length: n/a
Entry Point: Shipwreck Shore
Prereqs: n/a
Recommended Party: solo only
Base Experience: 304
Quest Info:
--Creatures: Sahuagin, Sahuagin High Priestess (Red Named)
--Traps: One blade trap, disarmed by NPC if needed
Walkthrough:
The quest *is* a walkthrough. Each step is clearly outlined in the objectives and NPC dialog.
End Reward: Select one of:
- Ember Great Axe (+1 fire damage)
- Ember Heavy Mace (+1 fire damage)
- Ember Longsword (+1 fire damage)
- Ember Rapier (+1 fire damage)
- Soren's Handwraps (+1 acid damage)
- Eternal Wand of Finger of Fire (1d3 fire damage)
The following also appear in your pack automatically:
- Ring of water breathing
- Armor, robe or outfit, as appropriate
- Possibly a ranged weapon
- Possibly a shieldLeader of Lost Legions
~Sarlona~
-
09-11-2009, 11:52 PM #243Community Member


- Join Date
- Aug 2007
- Posts
- 332
Your format and work on these guides are amazing.
I'm sure you are busy with new content and such but would love to see some updates to this most valuable resource.
I've added a link to it in my.ddo profile
(Needs some guides to Stormreaver, updated Kobold, Prey etc, maybe expand on the Cruelean Hills Quests) I'd be happy to help out where I can - just let me know what's needed to keep this thread alive and active ^-~
-
10-29-2009, 07:48 AM #244
Dream Conspiracy
Quest Giver: Graden Wylkes, in the Wylkes Manor in Inspired Quarter (Old Harbor)
Level: 18 (Party)
Patron: Coinlord. (6/12/18)
Length: medium
Entry Point: Sewer entrance in Inspired Quarter, called the Sunken Parish
Prereqs: n/a
Recommended Party: 3-6, evasion and/or hp person to trigger traps and lockpick/knocker is nice
Base Experience: 3,826
--optional experience: prisoners ~ 800xp, secret treasure chamber ~ 2,200xp
Quest Info:
--Creatures: Humans, Elemental, Rats, Spectres
--Traps: Spiked levers and Disjunction traps, very high dcs (60's-70's?). Secret doors hide the prisoner options and bonus chest. (thanks Jimmymac32409 for the correction)
Walkthrough:
Not going to go into to much detail, but figured I would share some notes.
After the red named fire elemental there is a chest that is back against the wall, we didn't see it our first time in there so be sure to snag it.
There is no way to really save the 3 prisoners. Release the prisoners before you start the end fight if you want the optional xp. But even if you let them out of their cells and get the xp... did you really save them? They end up dead anyways.
Drops the blue disc and pieces. Shards/Discs of Phantasms.
Optional puzzle:
1- the floor breaks out when the ceiling rune is lit. There is a bonus chest (locked) behind a mid-fall secret door. It takes a bit of decent timing with featherfall to open the door and to get up to the chest you will need a solid jump skill. Or, it is possible to fill the room with water, using a valve underwater near the fire elemental: http://forums.ddo.com/showpost.php?p...&postcount=248 Thanks for the tip, Emili!
2- If you want the optional xp and the bonus chest with extra discs and shards, you need to light the gem as well as the ceiling rune. So far I have seen 2 possible locations for the gem. I have taken screen shots of the completed puzzles in the two possible locations.
Would like to thank Sheelagh of the Harpers (Sarlona) for solving the much harder of the two puzzle maps, I was about ready to give up.
A third puzzle solution has also been posted a few posts down by Oxvon, thanks yo! I added the pics into this post as well. A fourth puzzle was found and solved by Jezabele of Sarlona, thanks Jez
The following two pictures are the front and back of the first gem location:


And the next two are of the second gem location (much harder puzzle, imho, thanks much Sheelagh.) :


The third puzzle by Oxvon:


Fourth puzzle by Jezabele:


End Reward:
Your choice of 4 random generated level appropriate items.Last edited by Lost_Leader; 11-02-2009 at 09:19 PM.
Leader of Lost Legions
~Sarlona~
-
10-29-2009, 07:54 AM #245
Level 18 Quests
A Vision of Destruction Raid
Dream Conspiracy
Finding the Path
Hound of Xoriat Raid
I Dream of Jeets
The Mindsunder
The Shipwrecked Spy
Leader of Lost Legions
~Sarlona~
-
10-29-2009, 08:01 AM #246
Level 19 Quests
A New Invasion
Bastion of Power
Genesis Point
Sins of Attrition
The Weapons Shipment
Wrath of the FlameLast edited by Lost_Leader; 11-08-2009 at 05:02 AM.
Leader of Lost Legions
~Sarlona~
-
10-29-2009, 08:01 AM #247
Level 20 Quests
Tower of Despair RaidLeader of Lost Legions
~Sarlona~
-
10-31-2009, 04:01 AM #248Community Member


- Join Date
- Apr 2006
- Posts
- 5,756
Nice write up... I do not know if you figured this out so...
FYI... In flooded hall (before the fire elemental room) to the right is an alcove with a valve...

It releases water into the room with the spikes (room under the puzzle). Bloody saved my cleric's bumn when the floor fell. (if you have True seeing on or detect secret doors a wall panel will light up in the water filled spike room... leading to a second chest)

swam over to other chest... (so it is two chests the puzzles gives)

Then swam back and climbed up ladder...

Last edited by Emili; 11-05-2009 at 09:14 AM.
♣ A Baker's dozen in the Prophets of the New Republic and Fallen Heroes. ♣
Abaigeal(TrBd25), Ailiae(TrDrd2), Ambyre(Rgr25), Amilia(Pl20), Einin(TrRgr25), Emili(TrFgt25), Heathier(TrClc22), Kynah(TrMnk25), Meallach(Brb25), Misbehaven(TrArt22), Myara(Rog22), Rosewood(TrBd25) and Sgail(TrWiz20) little somethings with flavour 'n favour
-
10-31-2009, 04:42 PM #249
-
11-01-2009, 11:53 AM #250Community Member


- Join Date
- May 2006
- Posts
- 0
The Traps CAN be disabled. Xiloscient posted it in the DDOCast forums http://s7.zetaboards.com/Ddocast/topic/8216946/1/ - POST #8 Originally Posted by Lost_Leader

Screen Shots in that post too.Last edited by jimmymac32409; 11-01-2009 at 11:56 AM.
-
11-02-2009, 05:18 AM #251
Nice, thanks for the updates on Dream Conspiracy. Made corrections, thanks all!
Leader of Lost Legions
~Sarlona~
-
11-06-2009, 09:47 PM #252Community Member

- Join Date
- May 2006
- Posts
- 4,666
Any guides out there for Genesis point yet?
-
11-08-2009, 05:01 AM #253
Genesis Point
Shavarath - Devil adventure pack
Quest Giver: Sebi, in Amrath
Level: 19 (Party)
Patron: The Yugoloth (8/16/24)
Length: very long
Entry Point: When you enter the Devil Battlefield, circle back around and travel west, slightly southward.
Prereqs: none
Recommended Party: 4+ (requires at least 2 players due to lever pulling)
Base Experience: 9060
--optional experience: n/a
Quest Info:
--Creatures: Orthons, Barbazus, Tieflings, Fiendish Troglodytes, Fiendish Trolls, Mephits (south ending), Marilith (north ending), Horned Devil (east ending), Portals (west ending)
--Traps: blades - turned off with a lever, not disable
Walkthrough:
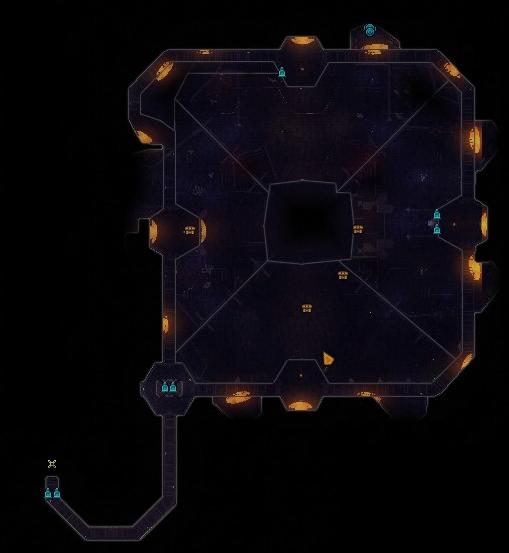
Genesis point is a military base for the Devils on Shavarath. Your job is to cripple one of the four functions of the base. If you read the information given by the Yugoloth at the beginning of the quest, he will give you the walkthrough of what you need to do, but I will streamline it here and give a few tips.
First off, you need to clear the upper level. Circle around the top level, travelling either north or east at the first intersection. I usually travel north first since you will end up heading back that ways afterwords.
Travel the circle, clearing out each of the four control centers. Each control center will have 3 waves of devils and tieflings, so be prepared for some fighting in each room. Crowd control spells and displacement can be a great benefit here. When the room is clear, pull the lever in the center of the room, the one in the red pit. There will still be a lever inside a blue forcefield, don't worry about that just yet.
There are also several controls in each control room. These levers will affect different things in the rooms below. For the most part you can ignore these controls at this point, with the exception of the levers which control the doors between the lower lever rooms. If you start to the north, use the lever on the north side of the western room. Below you will notice that this opens the large door leading to the north.
Continue to the north side of the circle, again clearing the 3 waves of devils, hit the center lever in the red pit, and open the door below which leads to the east.
The east side repeat again, clearing the 3 waves, hitting the lever in the red pit and then opening the door which connects south.
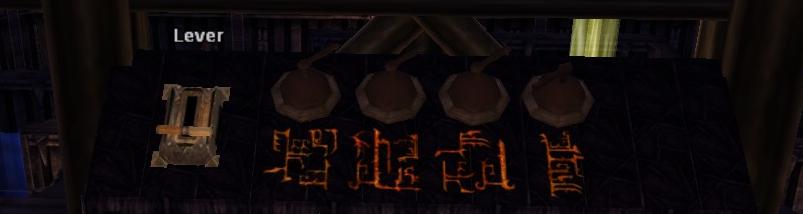
In the southern room clear as before and then hit the red pit lever. Do Not hit a lower door lever here, as you already have a clear path circling the lower level from east -> north -> west -> south. While you are here, hit the lever on the central control panel, as shown in the picture below. This will turn off the blade traps in the maze on the lower level.
Continue on to complete the circle. A shrine will now be available in the main intersection. Shrine up if you want, then head north again. With all 4 control rooms clear and the 4 red-pit levers pulled, a portal and a chest will now be available in the western control room. Loot up and head on down. (You can always come back up through the portal, it isn't a one-way trip)
This portion (west lower level) is the crate storage of the Portal Bay. your job here is to kill everything and destroy the crates. Be careful, the crates contain extra badguys. Once this is cleared out, head north through the door which you opened with the levers above.
Now you are in the outer area of the Detention Center (northern lower level) where prisoners are kept inside magical barriers. There are a lot of badguys, mostly orthons and trolls, hiding throughout the holding pens. Work your way through and clear them out, then when it's clear, hit the levers on each of the 5 holding pens. This will allow the barriers to be lowered from the control room above (a step we will come back to). Once the room is clear and the levers all pulled, head east through the door that you had opened from above earlier.
This is the entrance to the Command Center (lower level east), currently being used by an elite troop for a pep rally. When you get close, the troop will come at you in waves. Take them out and then take out their commander. Loot the chest and shrine if needed. Clear the way south through the door that you had opened from above earlier.
You are now in the power conduit area which is before the Magical Channeling Center, it is protected by a maze with blade traps (which we turned off earlier.) The maze requires at least one person to move through and at least one person to hit levers in the control room above. You now need to split your group, sending a group of people back around the way you came all the way back to and through the western portal to go back to the upper levels. This group needs to be able to handle small groups of respawning orthons. Once this group is back to the upper level, they should travel south to the level above the maze. The person in the maze is trying to reach the middle of the maze, where there is a vial of water and a book. There is also a big pillar of magical energy. Don't touch the font of pure magical energy, you will esplode. The group above will need to hit valves to lower barriers to the middle. Once water is placed on the book it will lower all the barriers in the maze, allowing everyone to move through the maze to get the two chests (one chest in the middle, and another randomly placed somewhere in the maze.
Now, have the maze group work their way back to the north room with the prisoners. Have the upper level group also work their way north to the control center above the detention center (north). In the north control center there is a panel with 5 valves. These valves will lower the (now unlocked) barriers around the prisoners. Lower the barriers and have the group on the lower level release all of the prisoners.
When the prisoners are all released, this should complete your four strategic objectives. When all four are completed the group will all be teleported from where-ever they are to be in a small security chamber with a ranking barbazu. Defeat the Barbazu and his minions, grab some loot, and then head back out through the portal. Note: If you happen to be esploded by the massive current of magical energy in the maze area, this is where you soulstone will be blown to. Luckily, there is a rez shrine in here.
Now you will notice that the big blue barrier around the center lever is lowered. Don't hit it just yet. This is where you make your choice of which strategic point you want to take out. (Which optional ending do you want?) Choose an ending from the four options (listed below), by moving to the corresponding control room on the top level and hitting the main lever which is now available. Then head to the lower level. There is a chest in the north area and if you haven't looted the ones in the south, there are 2 in the maze area. After looting, move to the secure area that you chose above.
West (Portal Bay): If you hit the west lever, you will be choosing the Portal Bay, where the devils bring in troops and supplies. This ending is similar to part one of The Shroud, your job is to destroy the portals while they spawn badguys.
North (Detention Center): If you choose the lever to the north, you will be choosing the Detention Center. The goal here is to defeat the traitorous Demon Informant, a Marilith. This is a tough ending, as there is constant spawnings of orthons and powerful barbazu. You need to work your way through the detention hall, and kill off the two rednamed before the main locked lever will open, this is where the Marilith is held. You can choose to open up all the side doors to release prisoners, but there is no optional xp or chests rewarded for doing so.
East (Command Center): The eastern choice is also a very difficult one. This is the command center of the Horned Devil, Primus Llotiquth. Several large battles against tieflings, fiendish troglodytes and trolls, as well as orthons and barbazu. Many casters will bombard you and constant respawns while you fight the Horned Devil.
South (Magical Conduits): In my opinion the easiest of the four (and the coolest looking). When you zone into the area send one person through the portal to hit levers. These levers control the energy bridges between the 3 conduits. Each of the three conduits is surrounded by a mass of mephits, including a red-named mephit. Your task here is to kill the three red-named mephits within a short time of one another. Our tactic was to send one person around to each conduit, gathering all the mephits, while telling the lever control person which lever to hit. Then bringing everything back to the entry point, the lever control person comes back down to the bottom, and the whole group unloads everything they have, taking special precaution to kill the three red-nameds fairly in-sync.
End Reward:
Your choice of 8 random generated level appropriate items.Last edited by Lost_Leader; 11-08-2009 at 05:23 AM.
Leader of Lost Legions
~Sarlona~
-
11-22-2009, 04:06 AM #254Community Member


- Join Date
- Aug 2009
- Posts
- 18
You're missing out on a very important bit of information here - the lever room shows up as an ethereal milky white banner on one of the exits in one of the colored towers. The method works well - just pay due dillegence to not run in loops and explore different branches of 'backing' up from the 4 cardinal directions starting from the shrine, but it's important to check every exit for this banner before leaving the room! Originally Posted by Lost_Leader
-
11-22-2009, 02:03 PM #255
It's been a very long time since I wrote that one Originally Posted by mistahnice
I'll update it with that awesome bit of info right away, thanks yo!
Leader of Lost Legions
~Sarlona~
-
01-10-2010, 07:23 AM #256Community Member
- Join Date
- Aug 2009
- Posts
- 18
They removed the ledge so this no longer works as described. However, a hasted fvs/monk with wings or abundant step can glide straight to the stone ledge on the left side of your picture. Originally Posted by Lost_Leader
-
01-10-2010, 08:12 AM #257Community Member

- Join Date
- Mar 2008
- Posts
- 37
 Dirk's missing rare
Minor update for Dirk's to include the other named kobold witchdoctor's (Zizoo) spawn point and the other unique trinket that can drop. Originally Posted by Lost_Leader
Dirk's missing rare
Minor update for Dirk's to include the other named kobold witchdoctor's (Zizoo) spawn point and the other unique trinket that can drop. Originally Posted by Lost_Leader
As always - great job
-
04-18-2010, 01:38 PM #258Community Member
- Join Date
- Sep 2009
- Posts
- 64
havent read all the stuff, but VoN is now outdated.
Marek is right down outside the bank. also tharask arena is outside too. just look around. most NPC are in kundarak zone (outside of building). havent check precisely ...currently doing it.
-
05-10-2010, 11:18 AM #259Founder

- Join Date
- Feb 2006
- Posts
- 0
Great Job, but I feel it might be time for an update. Is your friend up to it?
 So many idiots, so few comets....
Originally Posted by Eladrin
-
06-03-2010, 04:16 PM #260Community Member

- Join Date
- Mar 2006
- Posts
- 275
I just ran this solo, and at the end I was unable to protect the final Venerated. It didn't fail the quest for me but rather the objected changed to something like (failure) fail to protec the venerated: 2 remaining. Originally Posted by Lost_Leader
I don't know if this was a change, or if it's based on group size or what, but you may not necessarily fail the whole thing if one of these guys dies. Definately if all 3 die... and the last room is definately the hardest one.


